The list below runs from a weekend paint job on stock cabinets to a full recessed alcove, and the deciding factor is how much of the basement you are willing to give up.
A one-wall layout leaves floor space for a sofa; a peninsula or island needs clearance on all sides and becomes the room’s center.
Butcher block takes a beating and sands back smooth, which matters when you are fitting this in on weekends. IKEA sells prefab cabinet boxes starting around $108, and the countertop runs less per square foot than quartz.
1. Butcher Block Countertop
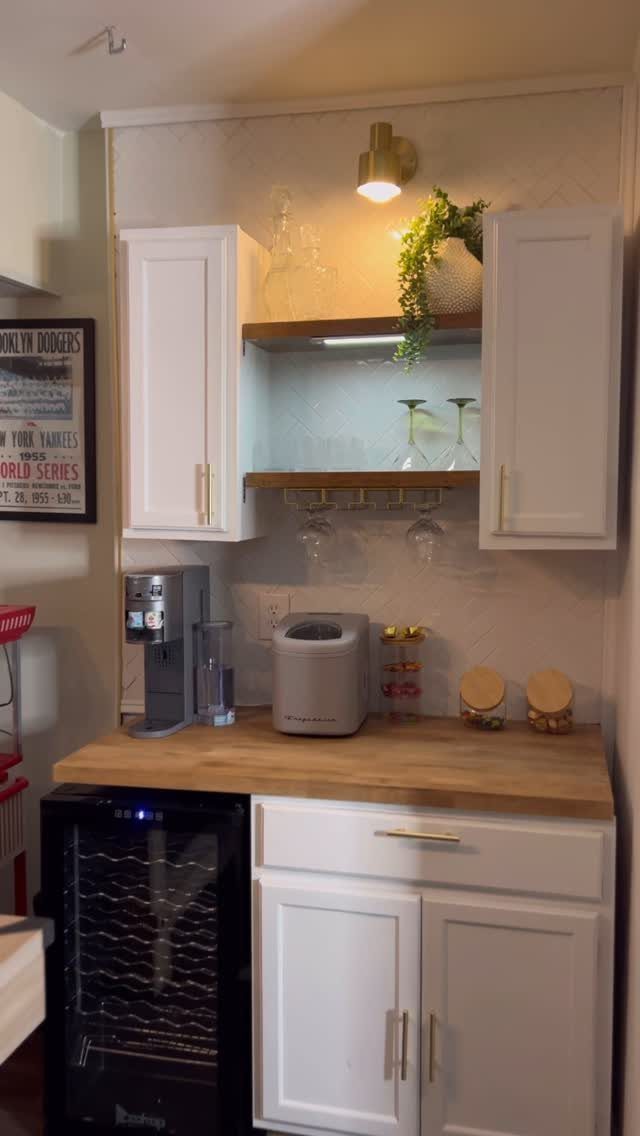
A butcher block countertop warms up a basement kitchenette without the upkeep headache of soapstone. I like it for the reader working weekends only: the surface takes a beating, sands back smooth, and costs less than quartz per square foot.
Prefab cabinets from IKEA start around $108, so the savings can go toward a thicker block. Light wood keeps a low ceiling from feeling lower.
Skip uppers on every wall if the space is mainly for drinks and snacks. One run of cabinets, open shelves on the rest, and the room stops shrinking.
I’d pick a thick slab for the counter; anything thin looks like a cutting board that lost its way.
2. Colorful Cabinetry
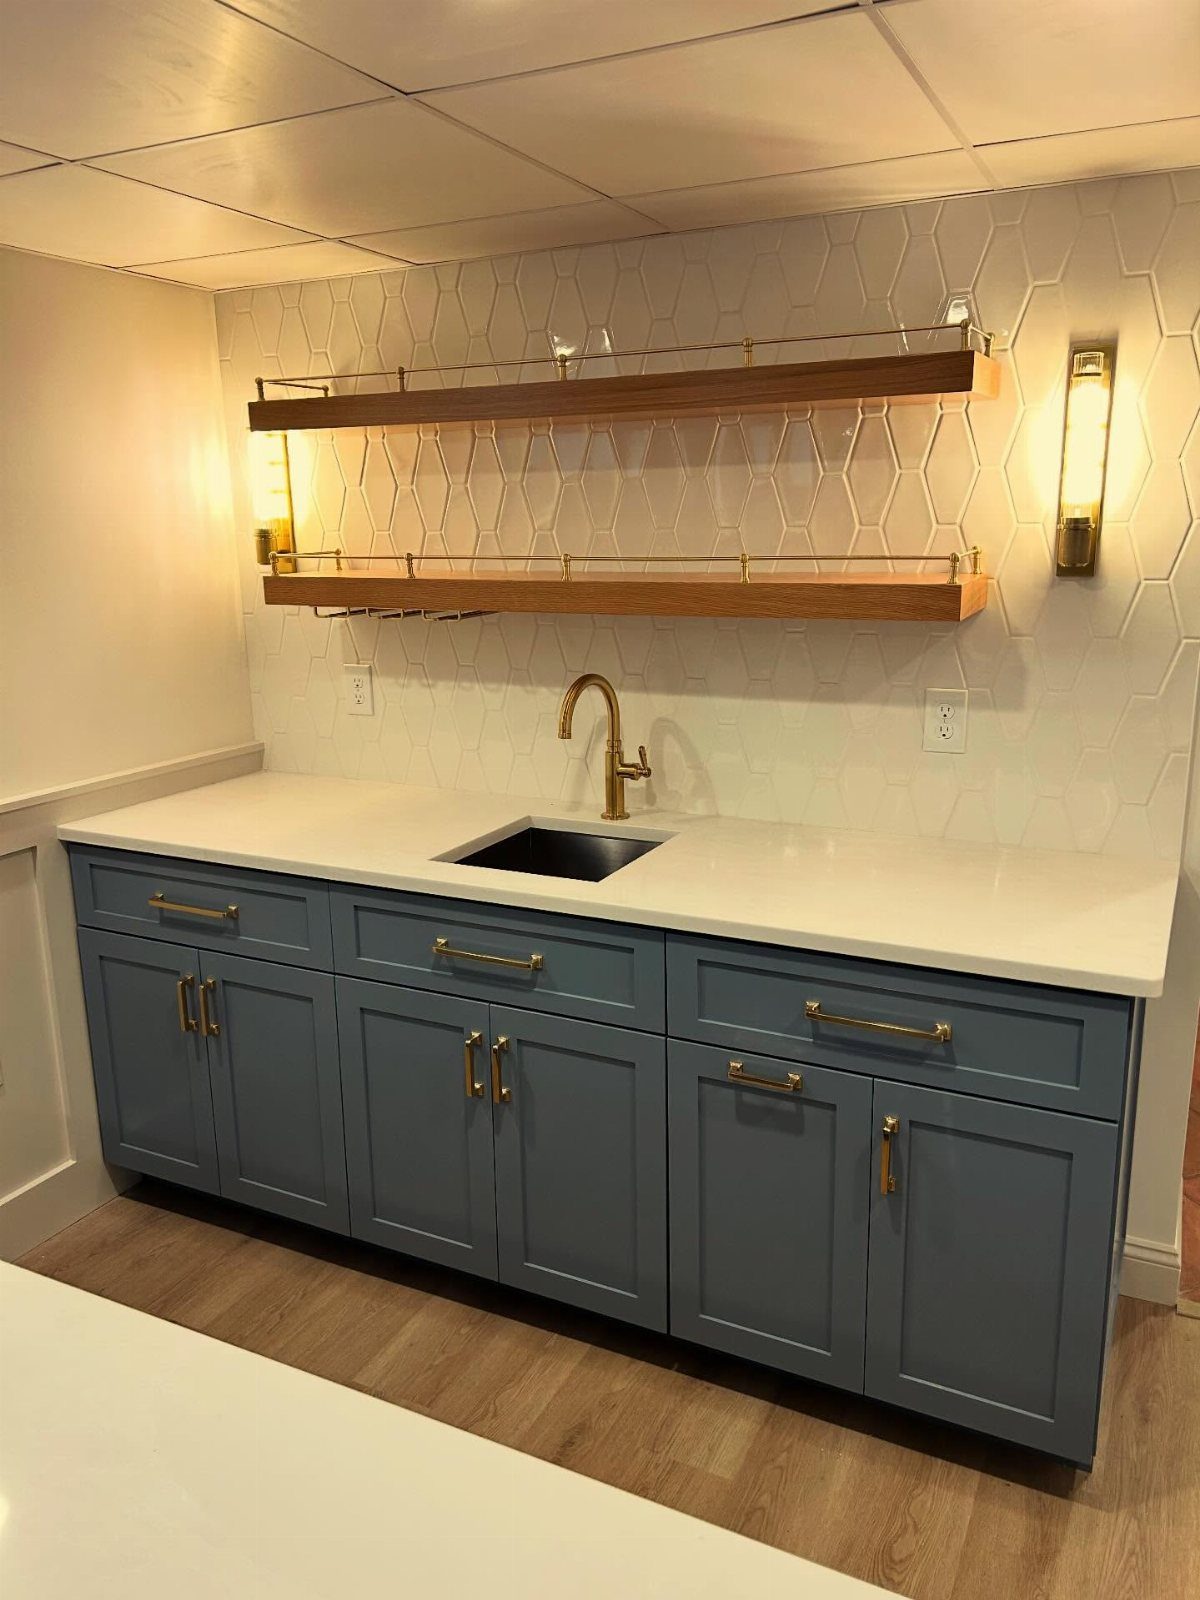
Blue cabinets with brass pulls turn a basement corner into somewhere you actually want to stand. Muted blue bases against white tile wake the space up without shouting.
Painted cabinets cost less than stained wood, and a small kitchenette means you can spring for the good enamel.
I had uppers hung only where the fridge sits in one basement job; the other walls stayed open for a TV and floating shelves. The saved square footage of cabinet paid for the upgrade to soft-close drawers.
Gold hardware against blue reads intentional, not trendy, and it hides water spots better than chrome.
3. Compact Appliances
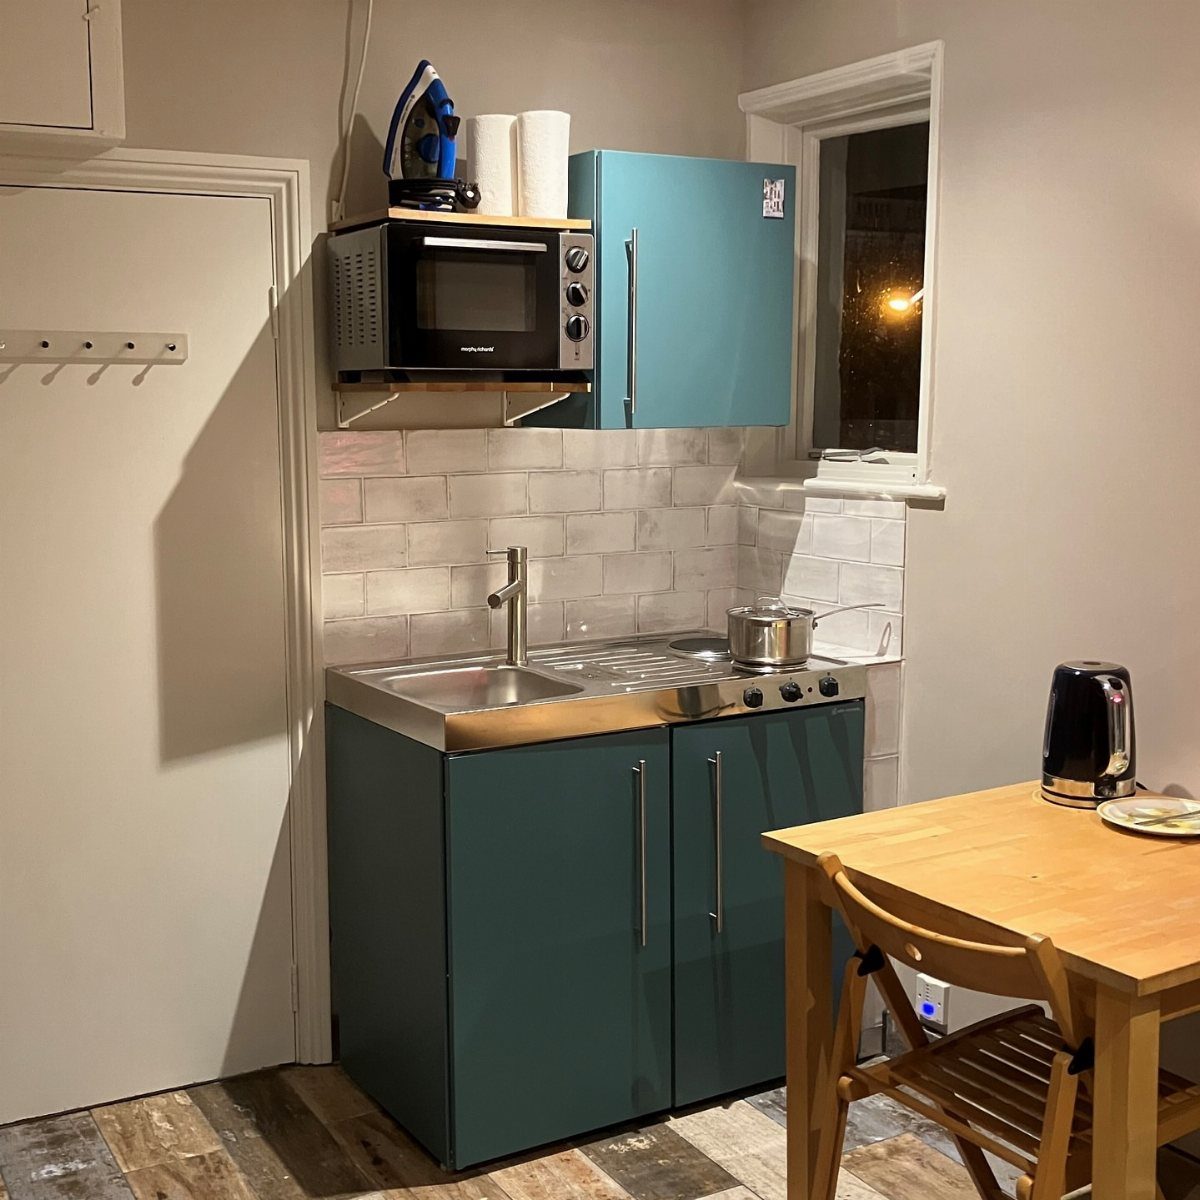
Teal cabinets and a two-burner cooktop squeezed into narrow counter space: this is what happens when you choose appliances before you order cabinets.
I design around a 24-inch fridge, a bar-size sink, and a microwave drawer mounted up high to keep the prep surface clear.
Energy-efficient models rated for basement humidity run a bit more upfront, but they last longer in damp air.
An induction cooktop drops into the counter with no oven below it; for a space used mainly for reheating and the occasional fried egg, that trade suits most readers.
Order appliances first, build cabinets to their exact specs, and the run looks built-in instead of apologetic.
4. Wine Fridge
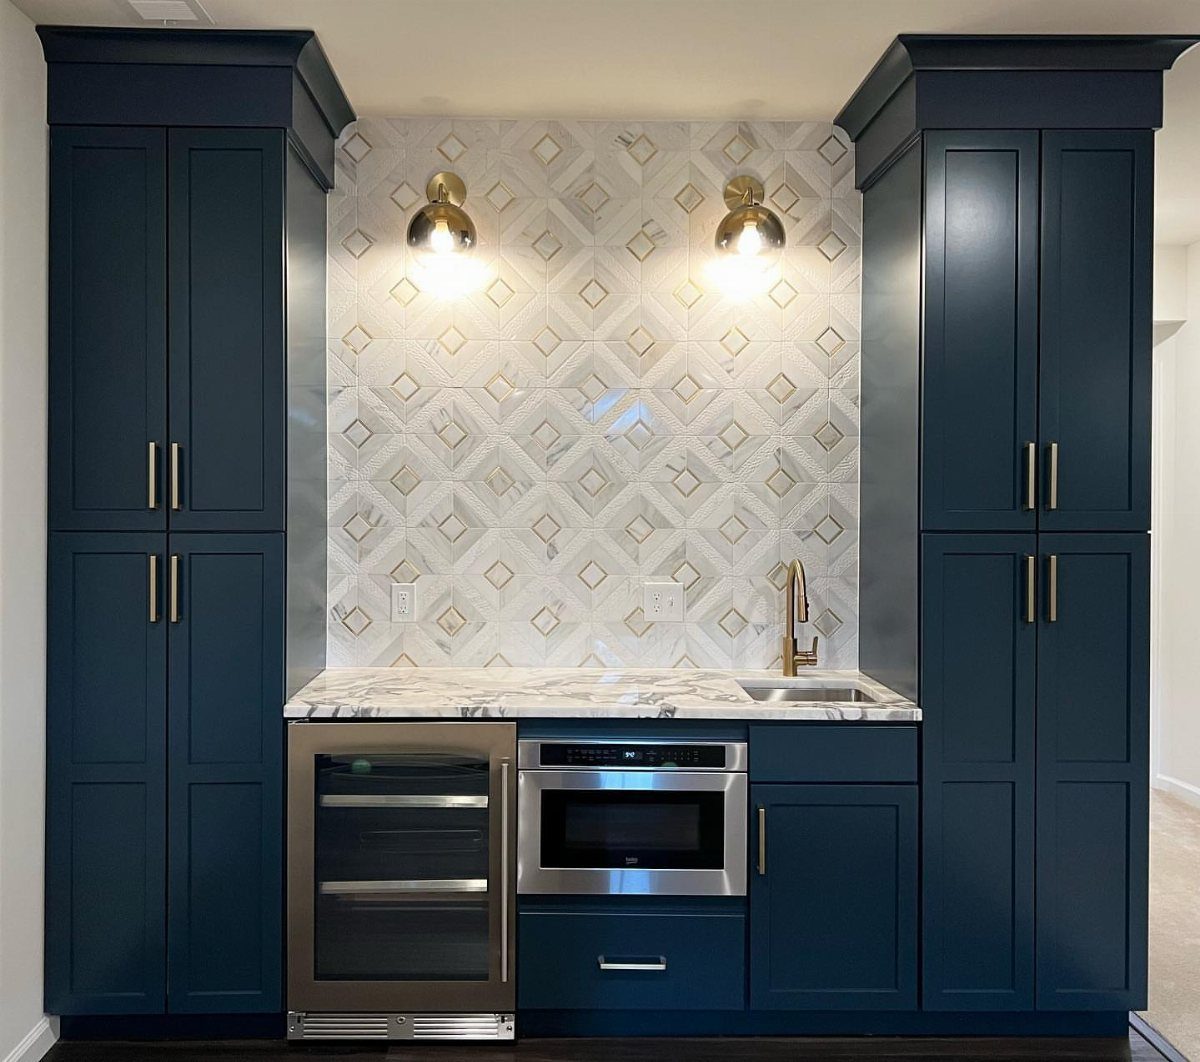
A wine fridge tucked under the counter turns a basement wet bar into the room people drift toward. Dark teal cabinets and marble counter frame a cooler at knee height, easy to reach while you’re mixing.
Not every basement needs a stove. Check whether your cooler needs venting front or back before you order cabinets around it.
A freestanding unit slides in later; a built-in needs that decision now.
5. Strategic Appliance Placement
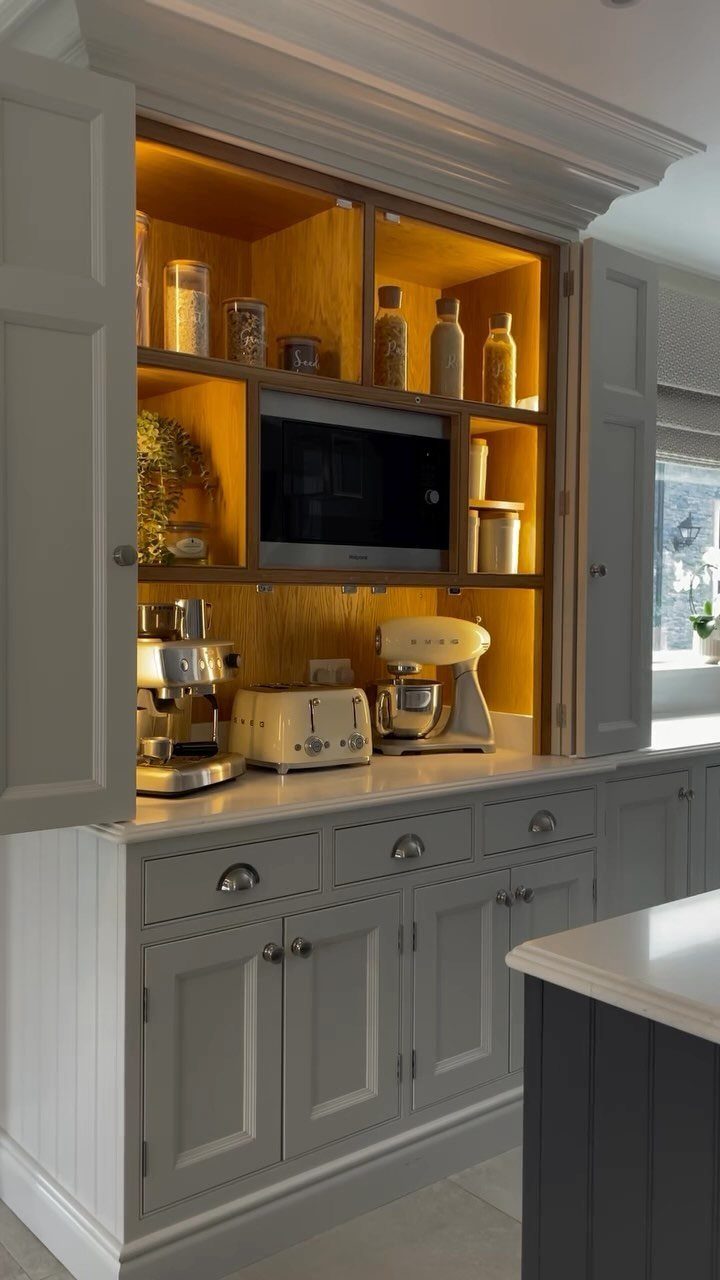
An appliance garage with warm interior lighting keeps the microwave, espresso machine, and toaster behind doors that close.
With the doors open, the appliances are right there; closed, the kitchenette reads as calm counter and wood shelves, not a clutter of cords.
I mount the microwave inside the cabinet to free the counter for prep. A bar-size single-bowl sink leaves more room beside it than a standard basin would.
The trick is designing the run around exact appliance specs before cabinets get ordered. For basement humidity, I pick appliances with sealed controls; the damp down there finds every gap.
6. Art and Plants
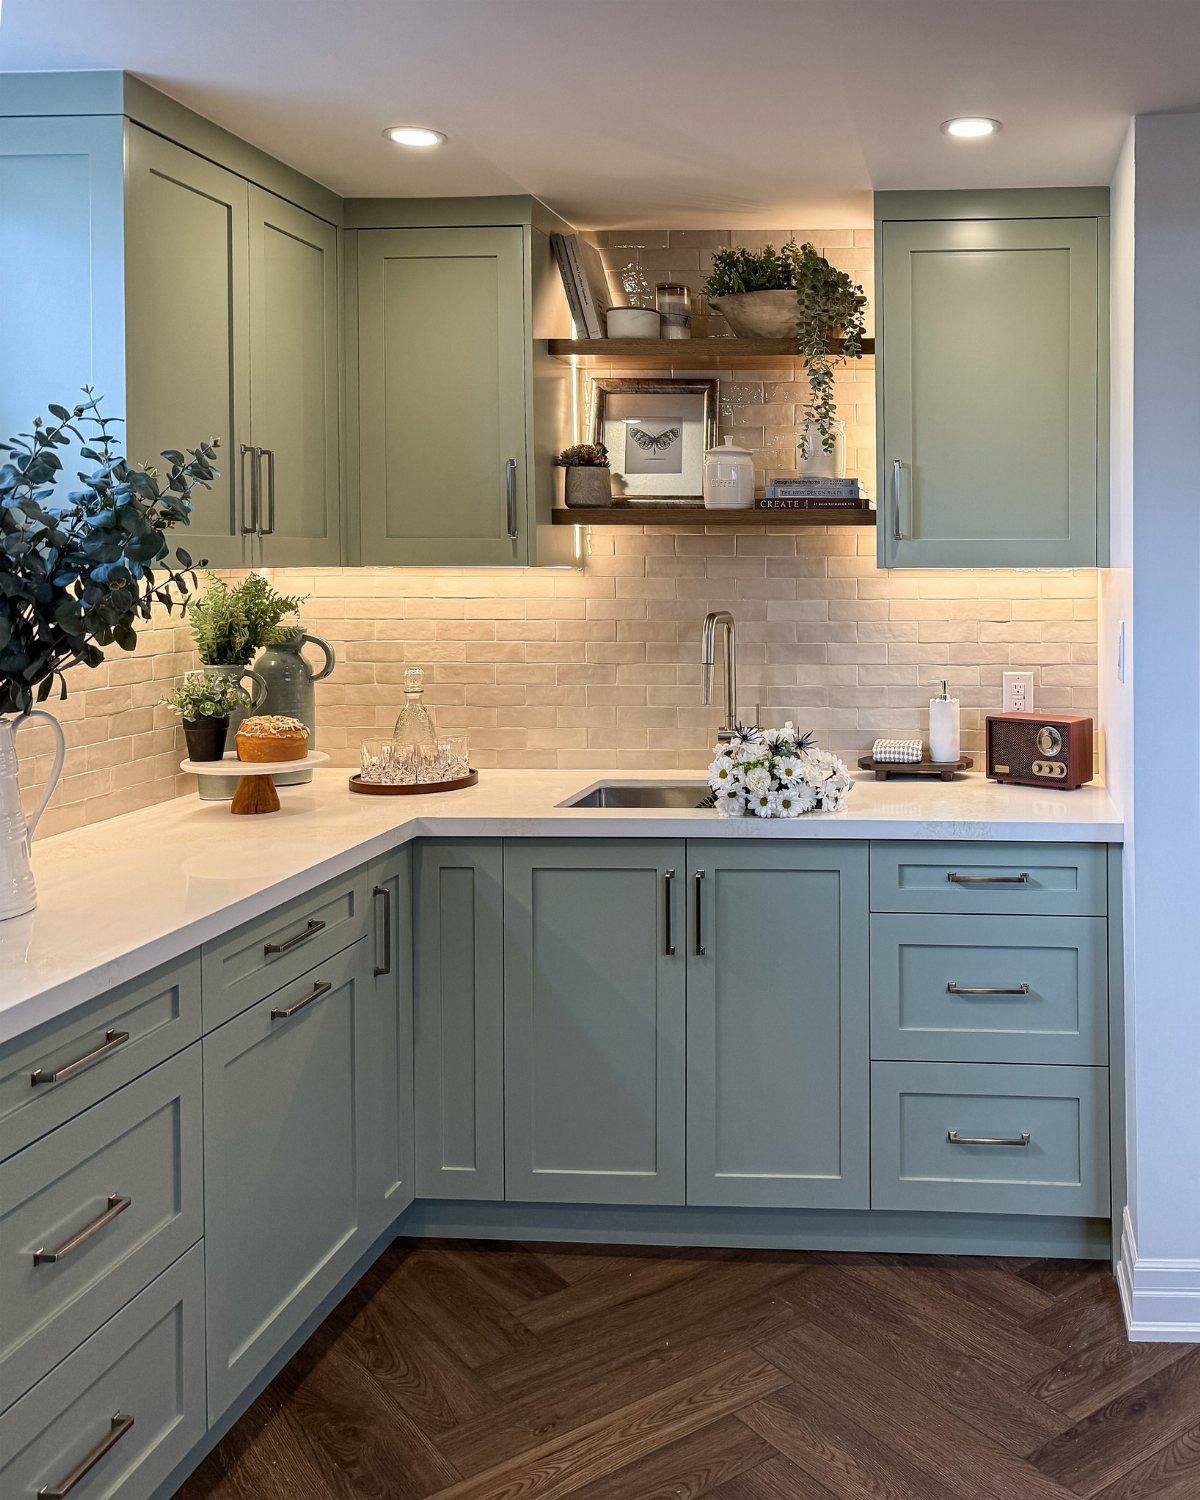
Sage green cabinets and open shelves hold potted plants, framed art, and the odd cookbook: a kitchenette that looks lived-in, not installed.
I keep the plant count low enough that watering doesn’t become a chore. Two or three in white ceramic pots, matched to the counter, and the eye reads them as intentional.
Pink and white dishes on open shelving do the same work in another basement I finished; they’re functional until company comes, then they’re the display.
Pick one color for your accents and repeat it: the green cabinets set the rule, everything else follows.
7. Peninsula or Island
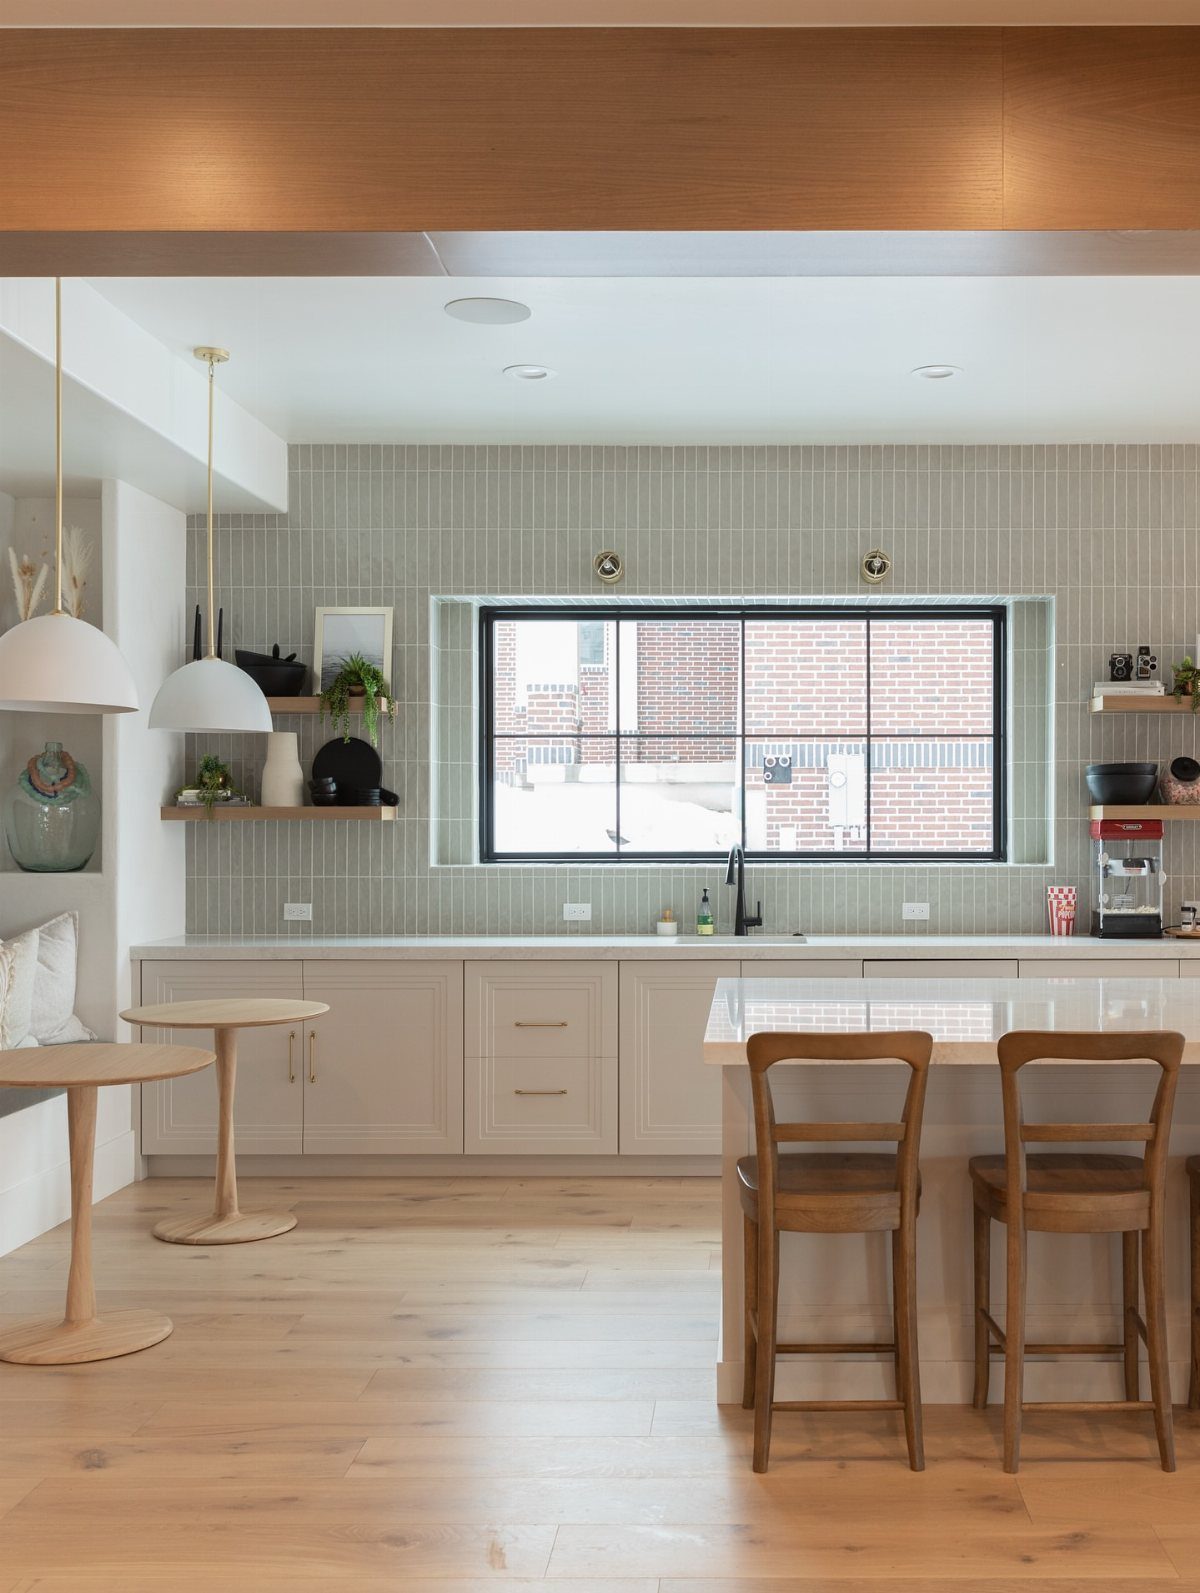
A peninsula or island turns a basement kitchenette from a wall of appliances into a room people gather in.
A freestanding island gives you prep space on one side and a place to eat on the other, and marble on top stays cool for pastry work.
For a basement, I would check the floor first. A peninsula, bolted to the wall at one end, needs less clearance around it and works when the room is long and narrow.
An island needs breathing room on all sides so doors and drawers can open and someone can still walk past. Measure your space before you decide.
Wood on the base warms up a basement that might otherwise feel like an afterthought. Deep drawers in the island hold more than standard cabinets and you do not have to crouch to reach the back.
If you entertain even occasionally, the extra counter space pays off; if you only microwave and make coffee, a peninsula against the wall keeps the floor plan open and costs less.
8. Open Shelving
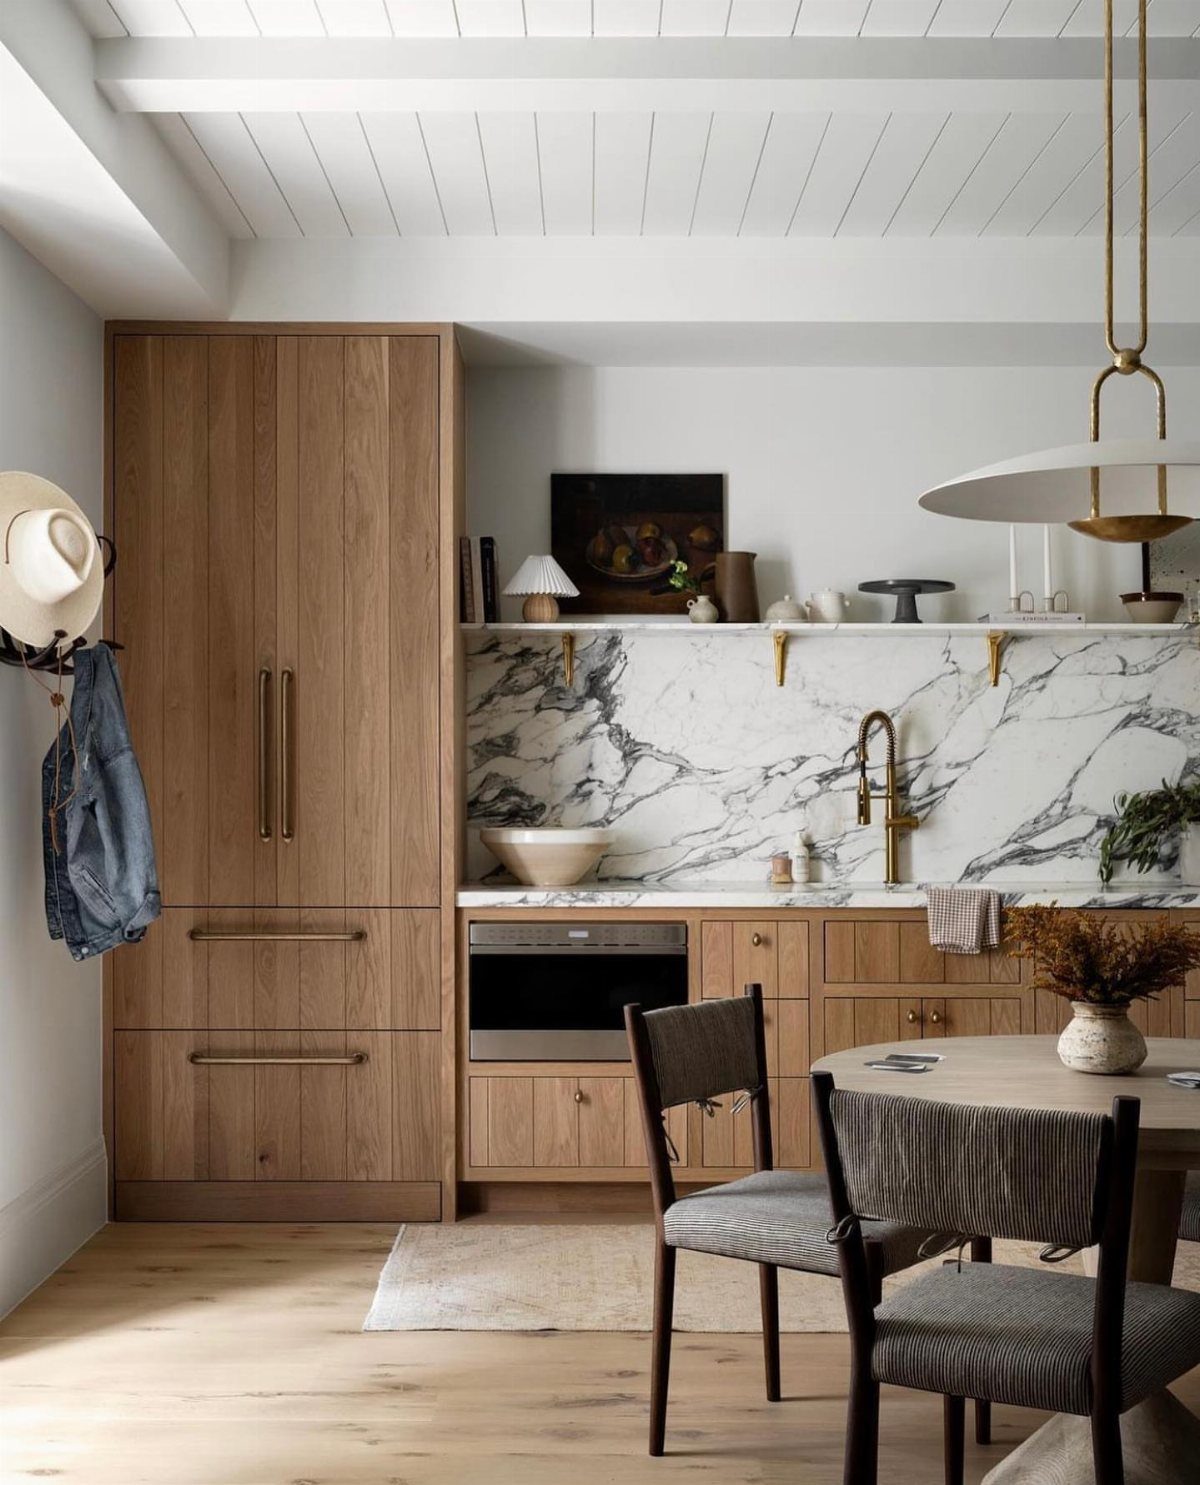
Open shelving above the counter keeps a small kitchenette from feeling boxed in. A single long shelf holds dishes and bowls you use often, and brass hardware adds quiet warmth that repeats in other details.
I would mount the shelf high enough above the counter that a kettle or blender sits below without crowding. Light wood tones reflect what little natural light a basement gets and keep the wall from feeling heavy.
Dishes you use daily stay cleaner on open shelves than pieces that sit for weeks.
For a basement, I would pair open shelves with closed cabinets below. The lower cabinets hide the less attractive necessities: the trash bin, the recycling, the small appliances you use twice a year.
The open shelf carries the visual load and lets you grab a plate without opening a door. If you collect ceramics or glassware, this is the move; if you own mostly mismatched plastic, stick to doors above and below.
9. Snack Station
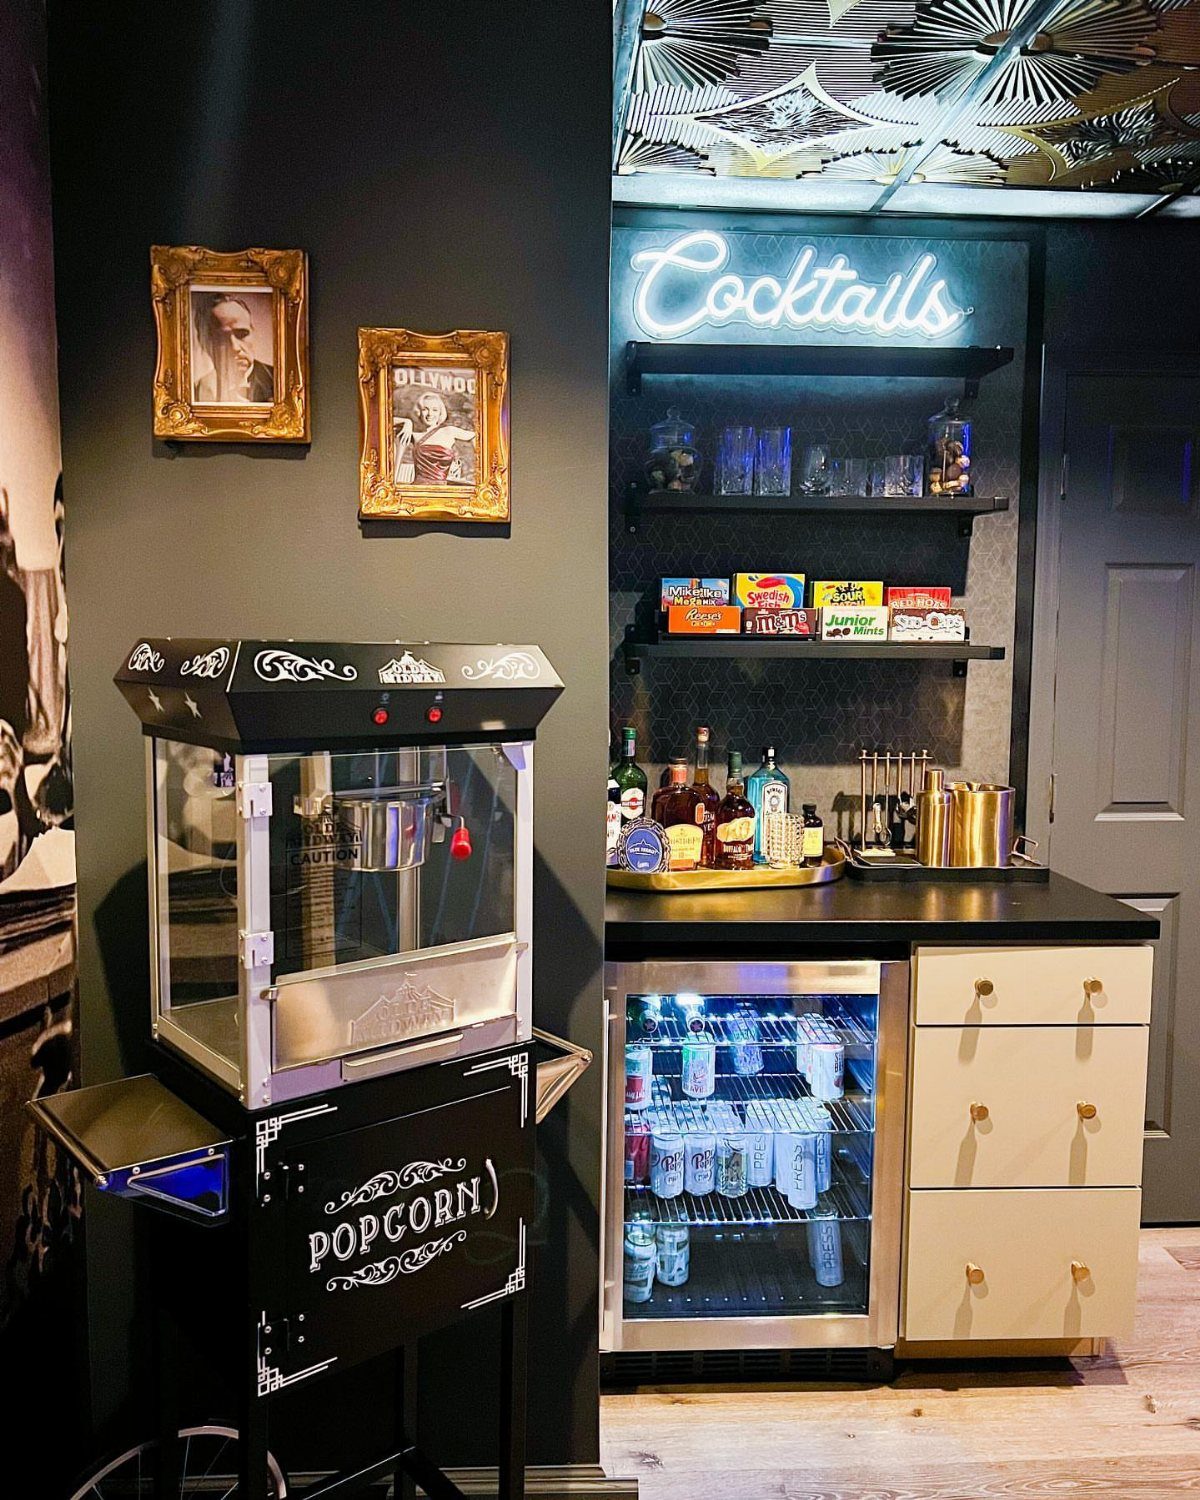
A snack station contains the mess of chips, popcorn, and sticky fingers to one corner of the basement.
A dark wall behind a popcorn cart, small beverage fridge, and shelving for candy boxes and glasses makes the space feel intentional rather than accidental; a neon sign finishes the mood.
I would build this around what your household actually consumes. A mini-fridge for canned drinks, a shelf at counter height for bowls and napkins, and a small cabinet below for bulk snacks you buy on sale.
For entertaining, this setup keeps guests out of the main kitchen upstairs. For families, it gives older kids a place to serve themselves without opening and closing the refrigerator door twelve times in an hour.
A dark wall hides scuffs; in a basement with already-low light, I would add under-shelf lighting so people can read labels without turning on the overheads.
Check code before you build anything into the triangle of space underneath basement stairs in a legal suite; drywall and fire protection requirements vary, and a designer can tell you what applies.
10. Use Vertical Space
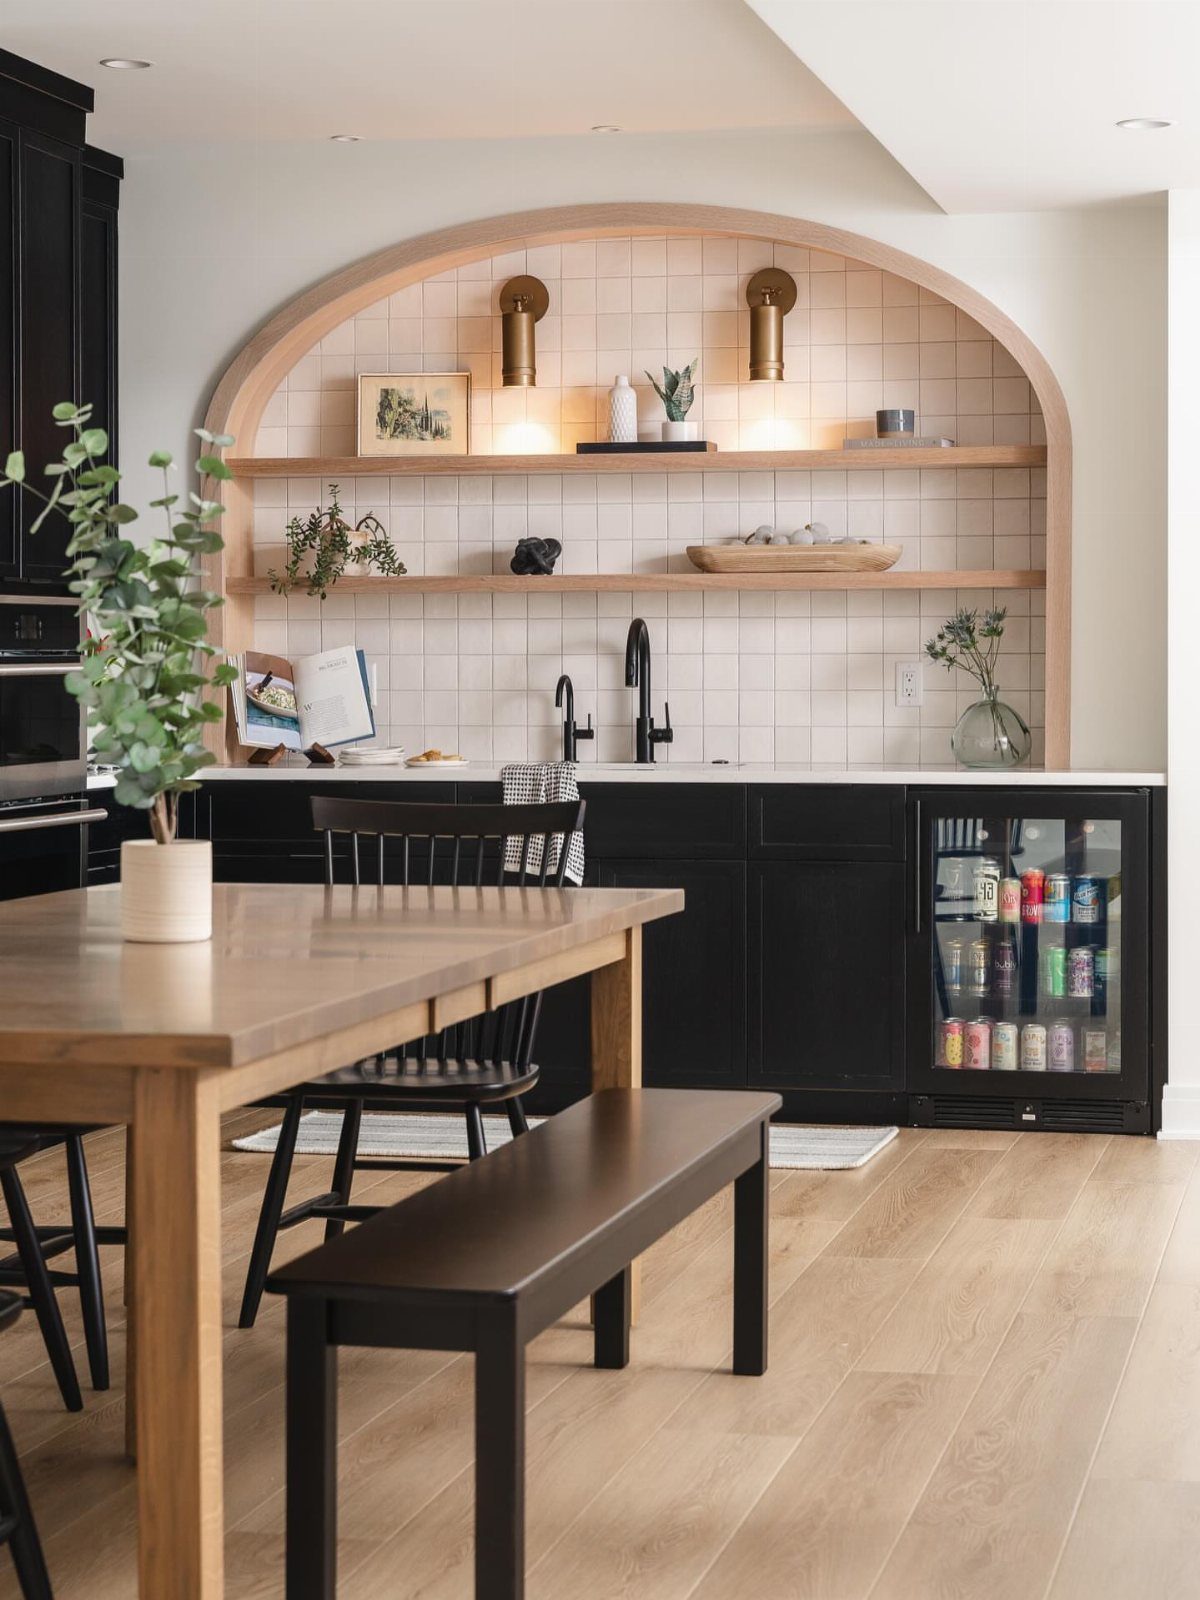
Basement ceilings are low and floor space is tight, so the wall between them becomes more valuable than square footage alone suggests.
An arched tiled niche with two floating shelves set into it, flanked by sconces, gains storage without stealing depth from the room.
I would look for the vertical spaces that already exist. The side of a refrigerator cabinet takes a narrow spice rack.
The backsplash above the counter, up to the cabinets, holds a magnetic knife strip or a rail for utensils.
A tall shelving unit in an unused corner stores the appliances you do not need daily and keeps the counter clear for the ones you do.
An arched niche is a custom detail; a simpler version is a pair of floating shelves in an existing alcove or between studs after you check for wiring.
Stop thinking of the kitchenette as a horizontal strip of counter and start using the full height of the wall. In a basement, that also draws the eye upward and makes the ceiling feel less oppressive.
11. One-Wall Kitchenette
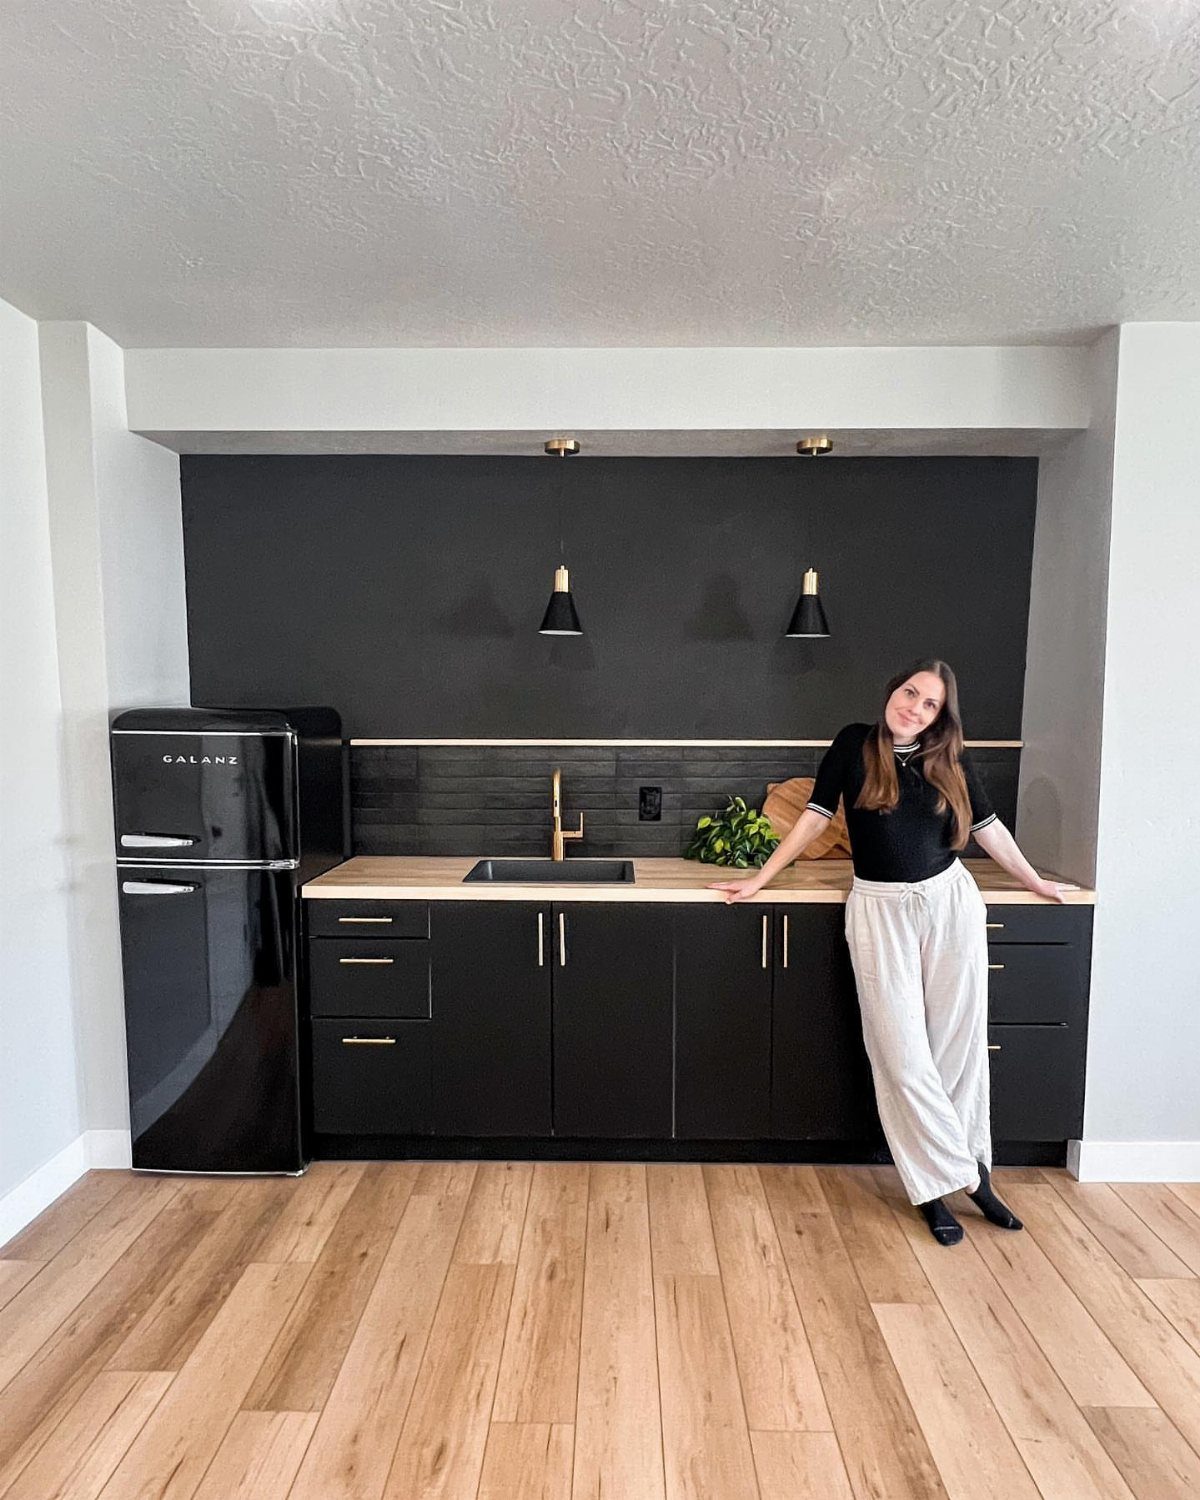
Every appliance and cabinet pressed against one wall leaves the rest of the basement free for a sofa, a desk, or a pool table.
A black kitchenette with a light wood counter, a sink, and a full-size refrigerator, all in a line under pendant lights, keeps everything within arm’s reach.
That wall handles cooking, cleanup, and cold storage while the floor around it stays open.
In a small basement, this is the layout I would pick first; it demands the least space and the least money while still giving you a real kitchen, not a hot plate in a corner.
12. Light and Airy Design
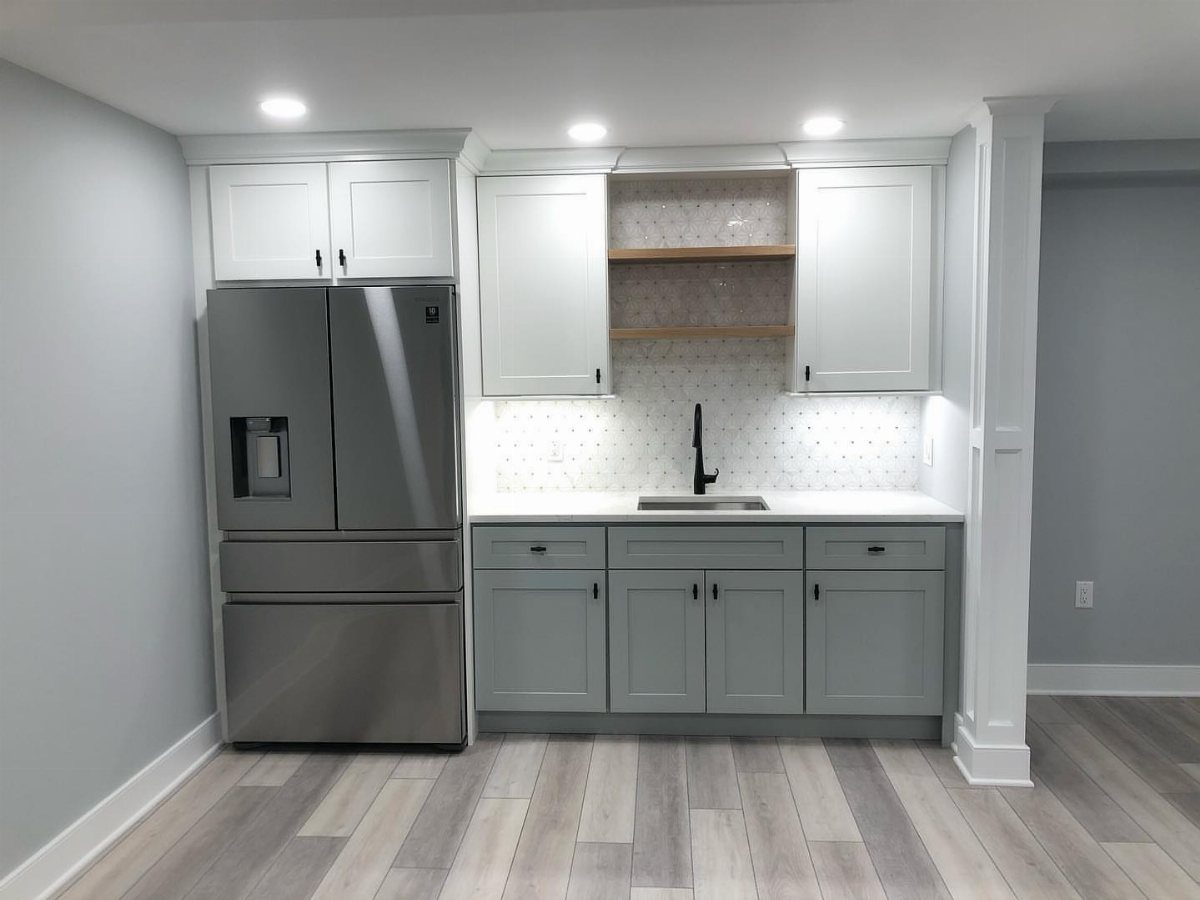
Light colors and reflective surfaces fight the cave feeling that basements default to. White upper cabinets, pale gray below, a white patterned backsplash with under-cabinet lighting, and light wood plank flooring bounce what light there is back into the room.
Every surface bounces what light enters, and the under-cabinet LEDs add a glow the ceiling fixtures cannot match alone.
I would paint the walls in soft white or a pale gray with warm undertones, not the blue-tinted shades that read as institutional. Cabinetry in a similar light hue keeps the eye moving without a hard stop.
Glossy tiles or quartz with subtle veining, as in the backsplash here, reflect both natural and artificial light better than matte finishes.
Open shelving or glass cabinet fronts, as one version of this idea, let light pass through and reduce the visual weight of upper storage. Everything on display must be worth looking at.
If your dishes are a mixed set from three decades of yard sales, solid cabinet doors in the same pale tone keep the brightness without the curation.
Layer the lighting: recessed cans for general brightness, pendants or under-cabinet strips for tasks, and a dimmer so the space softens after dinner.
13. Moody Dark Finishes
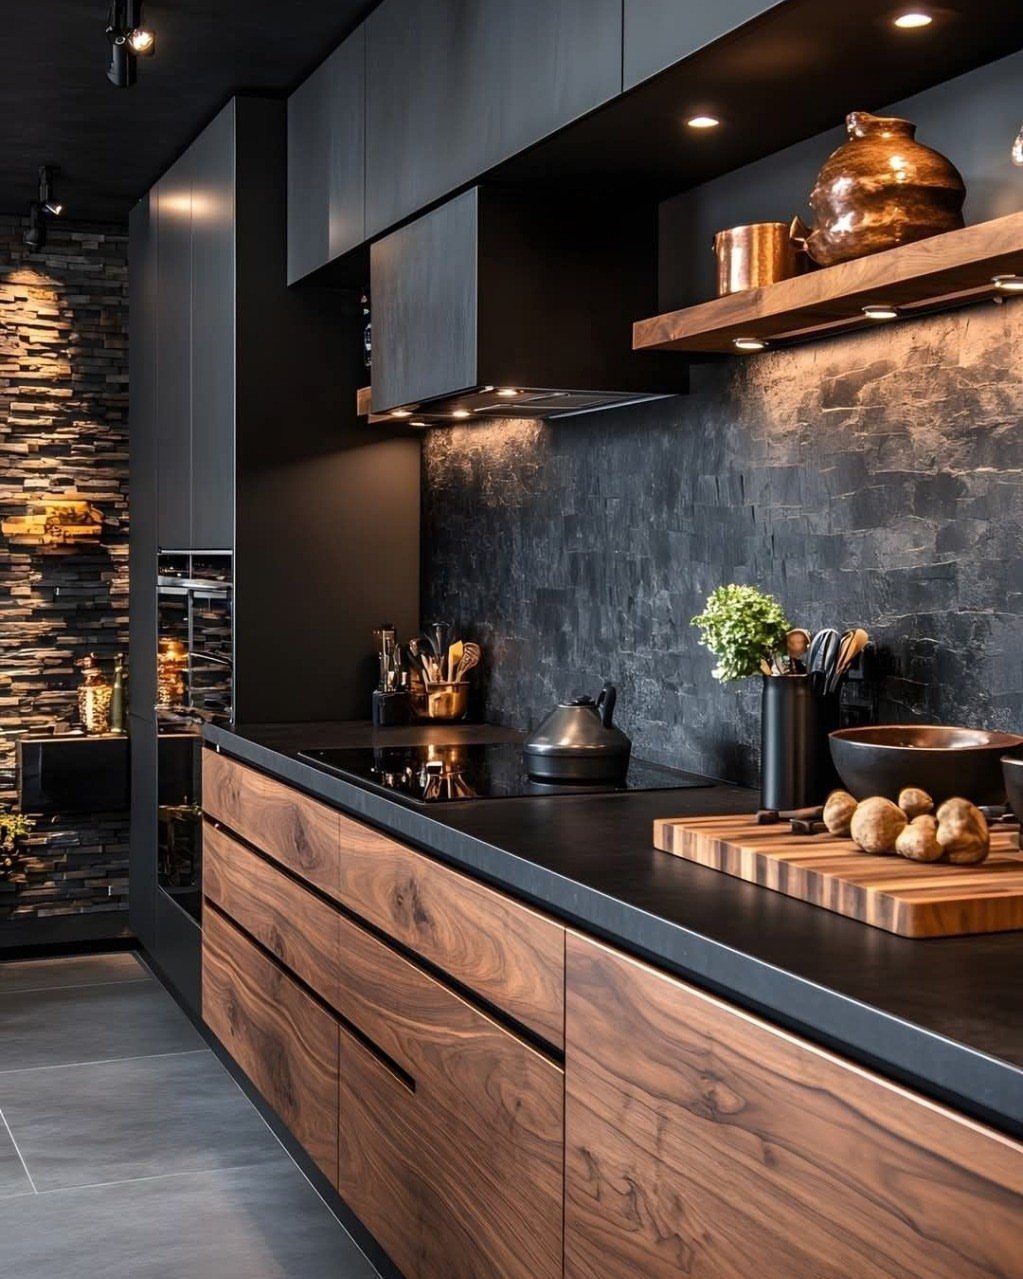
Black cabinetry below grade reads as cozy rather than cave-like when you pair it with something that throws light back.
Matte black upper cabinets over warm wood lowers give a basement kitchenette the visual interest a window would provide above ground, the grain doing that work. That split, dark over light, keeps the ceiling from pressing down.
A matte finish on the wood matters more than the species. Oak, maple, walnut-tone, all read warmer when the grain stays visible.
Skip the dark stain in a basement without windows; the photo gets away with black paint above because the wood below carries the warmth.
Under-cabinet lighting is non-negotiable here. Without it, black swallows the workspace.
A small, directed glow across the countertop is what keeps the space usable once the sun is gone.
Best for someone who wants the basement to feel like evening, not afternoon. If you need bright and open, this trades that away.
14. Painted Cabinets
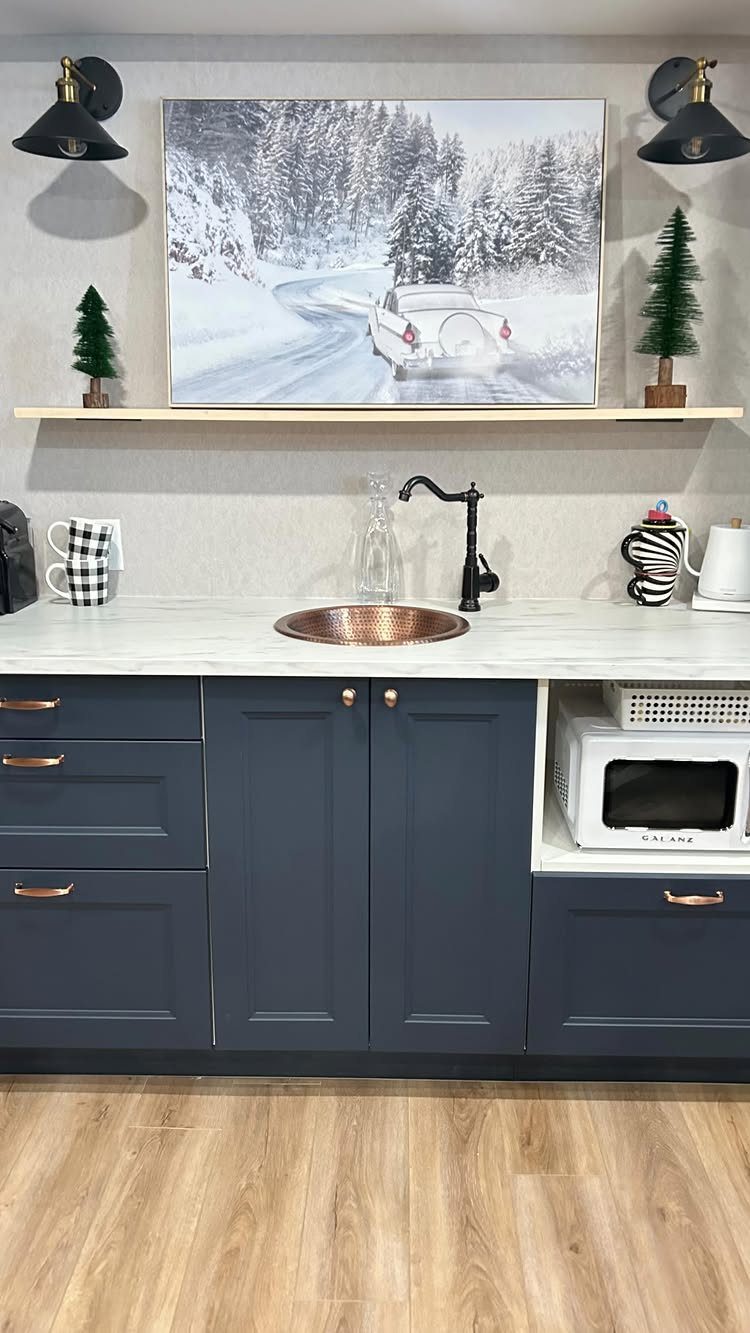
Paint and new hardware turn stock cabinets into something that looks considered for less than the cost of one custom door.
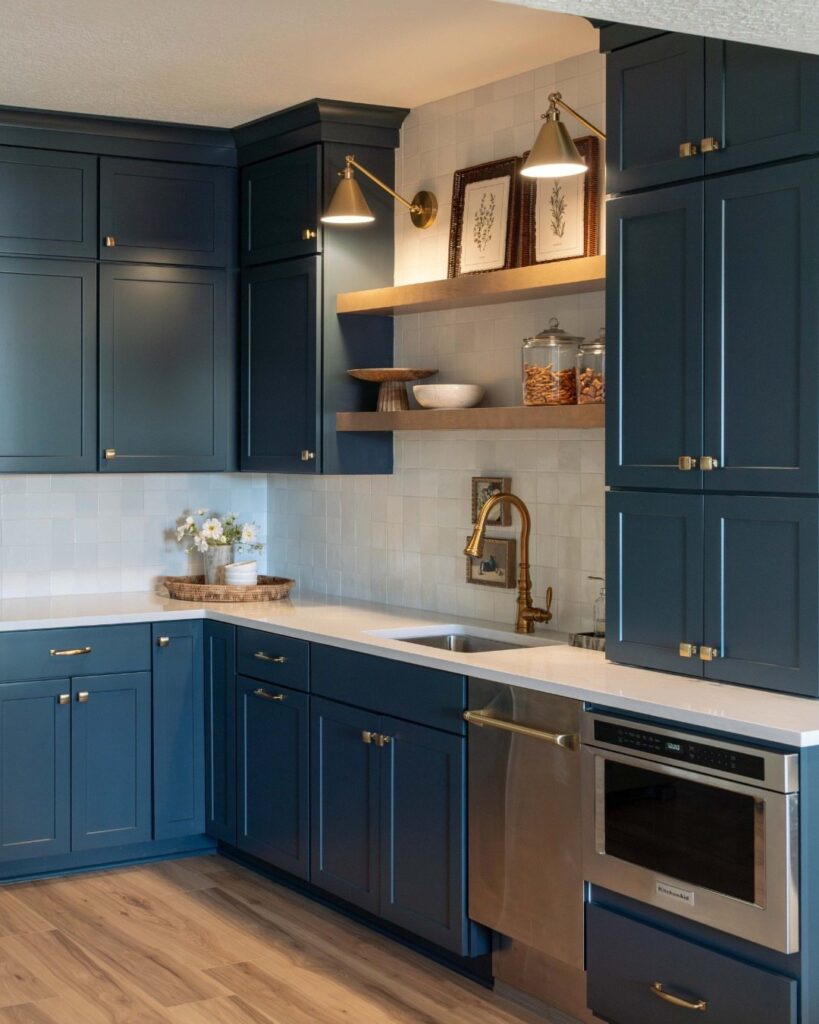
The navy leans gray enough to stay calm, and copper pulls and a copper sink pick up the warmth that blue can drain out of a room.
Shaker-style doors take paint well; the flat panel and simple frame don’t fight the color. The photo also shows a microwave cubby and an open shelf above, both easy adds if your cabinets stop at the counter.
That shelf, stained wood against the painted case, gives the eye somewhere to rest.
Copper darkens with use. Bright orange hardware darkens to something like bronze with enough handling, which is the look you wanted anyway.
This suits the reader who has a weekend, a brush, and cabinets that are structurally sound but visually tired. If the boxes are warped or the hinges stripped, paint only postpones the replacement.
15. Under-Stair Kitchenette
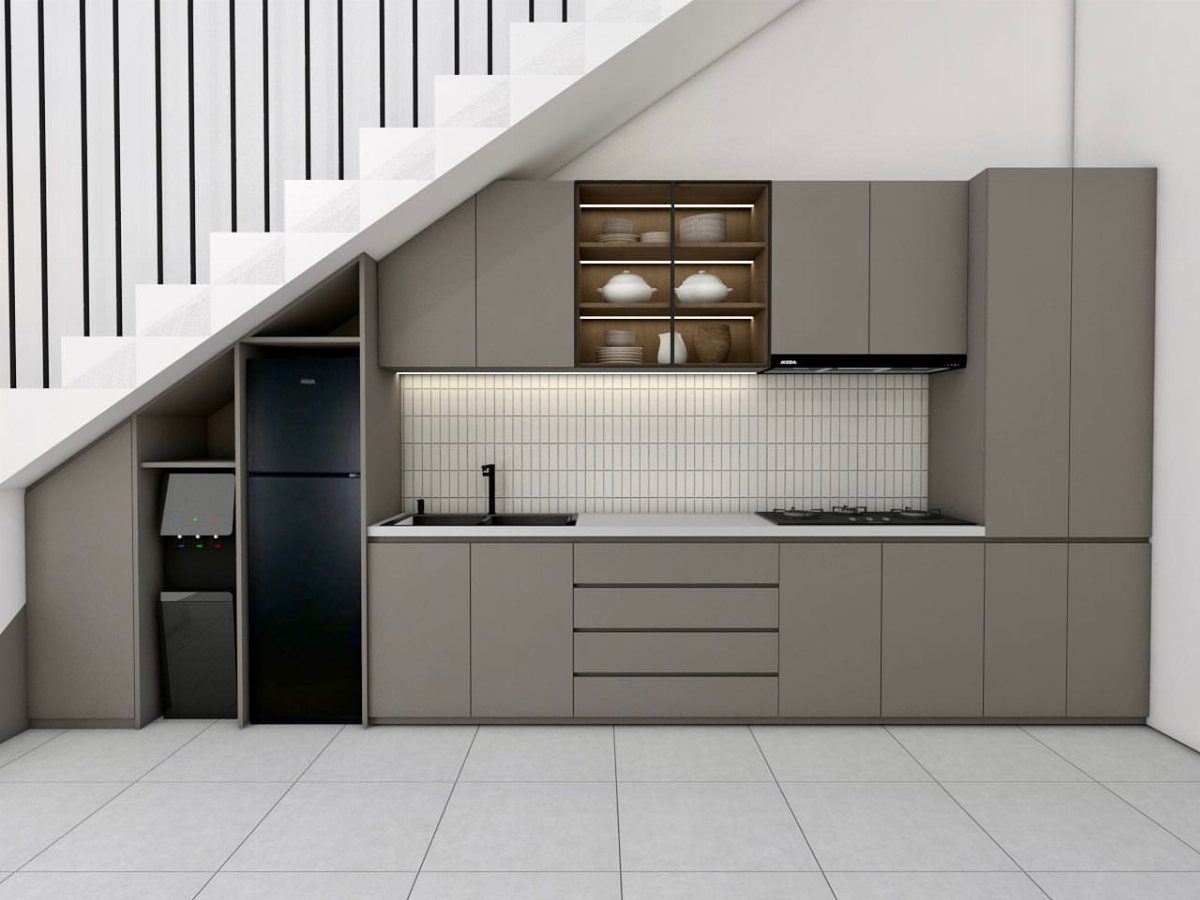
The triangle under the stairs usually holds paint cans and the vacuum you never use. A sink, cooktop, fridge, and cabinets that step up with the stair line can turn that dead zone into a full kitchenette.
A countertop that follows the stair slope reads as custom-built and does not add much to the labor.
Keep the working depth at the front of the stair triangle; the back is shallow, so the sink and cooktop belong where headroom allows. Pull-out drawers in the toe-kick zone reclaim the inches a standard cabinet would waste.
Fire-rated drywall and protection underneath may be required, and that changes both the depth you can build to and the cost.
Best for the basement where every square foot of wall is already spoken for. You lose some storage, but you gain a kitchen without touching the main living space.
16. Recessed Alcove Kitchenette
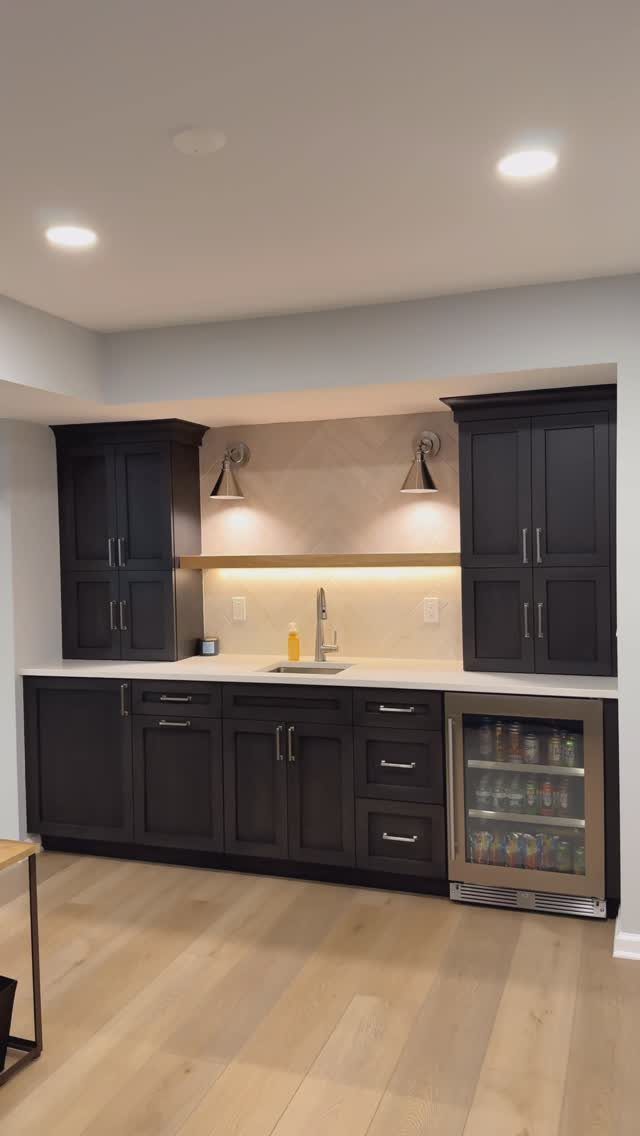
Recessing the kitchenette into the wall alcove pushes it back so the room reads as open floor until you need it.
Dark cabinets, light counters, and a beverage fridge behind glass, all set into a niche that would otherwise be blank wall or a closet door, give the alcove its purpose.
The lighting does the spatial work. Under-cabinet strips plus two wall sconces turn the alcove into a destination rather than a hole.
Without that layering, a recessed kitchenette risks looking like a afterthought or a concession.
Depth is your first check. A standard counter needs 24 inches; an alcove shallower than that means a reduced worktop or appliances that face the room, which breaks the whole point.
Measure before you plan.
This suits the basement that doubles as guest space or media room, where you want the kitchen present but not prominent. The trade is workspace; you are not prepping Thanksgiving dinner in an alcove.
17. Patterned Wallpaper Accent
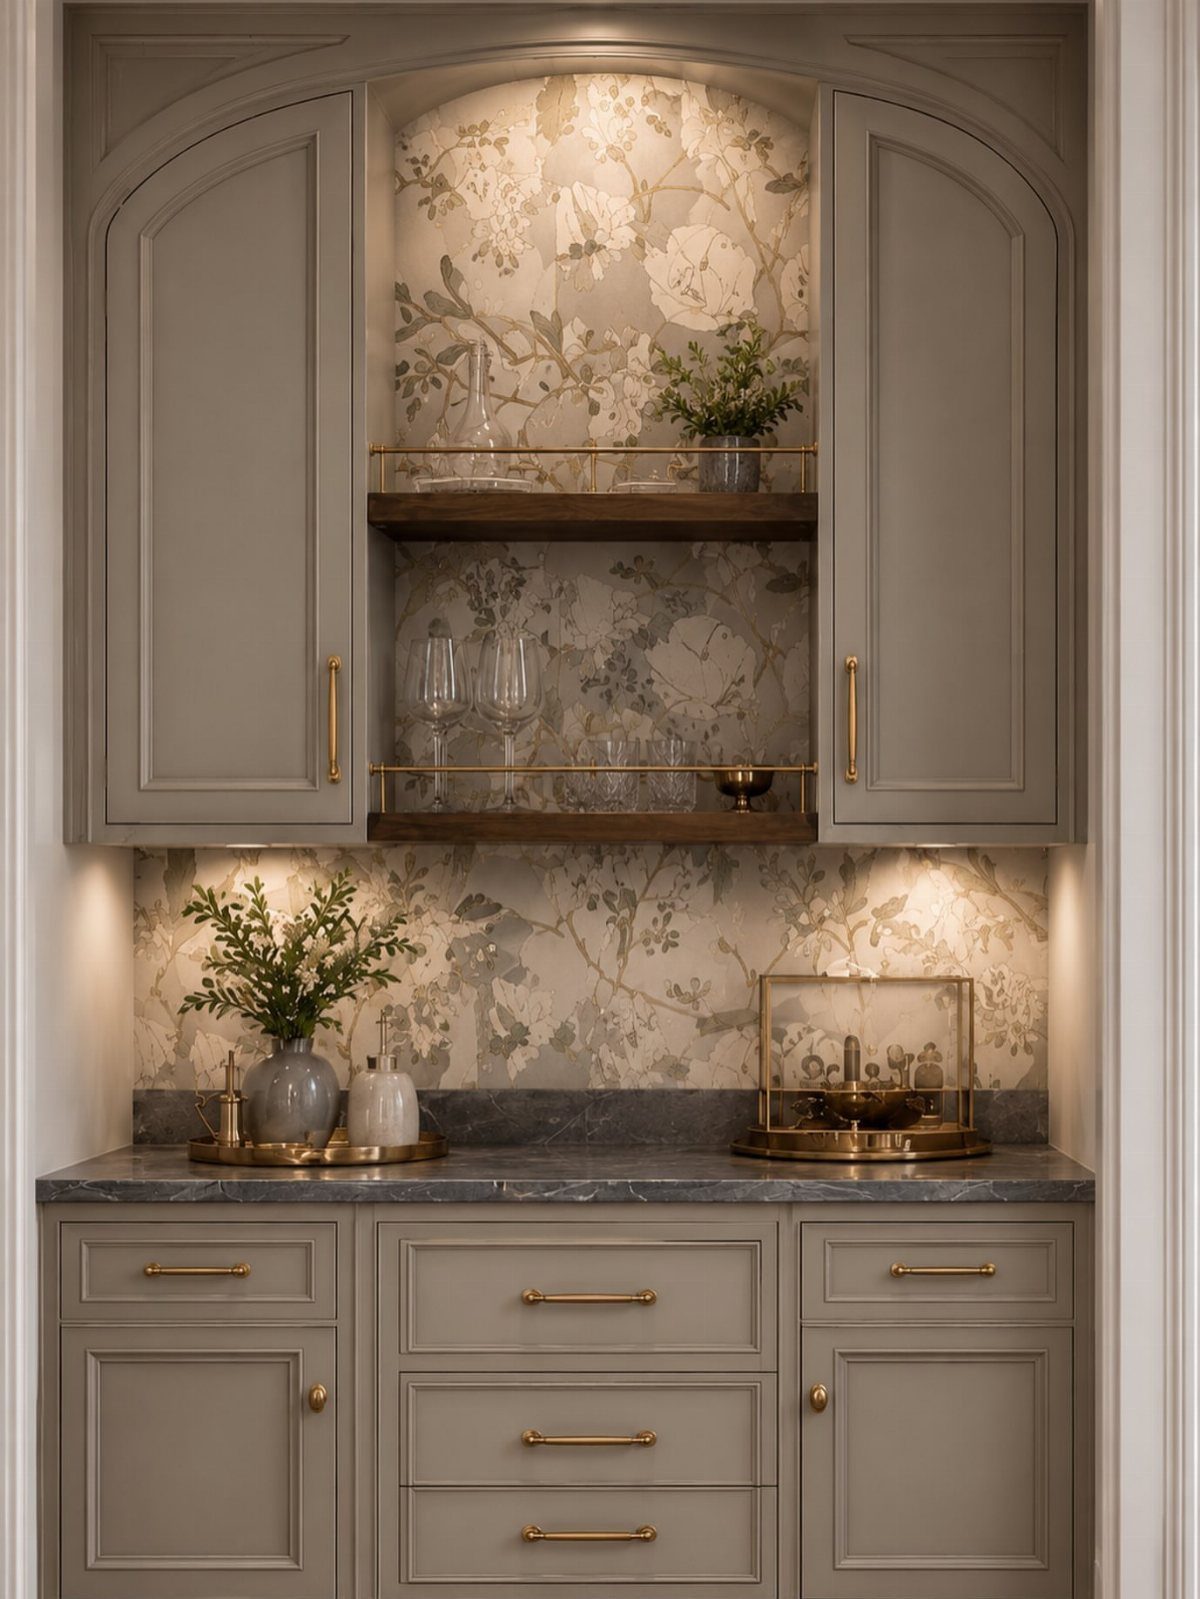
Wallpaper behind open shelves turns storage into display.
The floral reads as backing for glassware and bottles, not as the main event; the pattern is dense enough to hold the wall but quiet enough to let the objects in front speak.
Keep it to one plane and the wallpaper stays an accent; wrap it around a corner and it becomes a room you did not mean to make.
Cover every wall and the basement becomes a box of pattern; use it only where the shelves leave wall visible, and it becomes depth and texture. Taupe cabinets stay neutral so the wallpaper can do its work without competition.
Peel-and-stick papers have improved enough to handle the humidity of a basement if the space is conditioned. Traditional paste papers need a primer rated for below-grade moisture, or the seam lifts in year two.
This is a fast change with high impact for the reader who wants personality without permanent commitment.
If your shelves hold mismatched plastic and bulk snacks, the effect is lost; open storage demands curation, or at least a decision to buy matching glassware.
18. Vertical Slat Backsplash
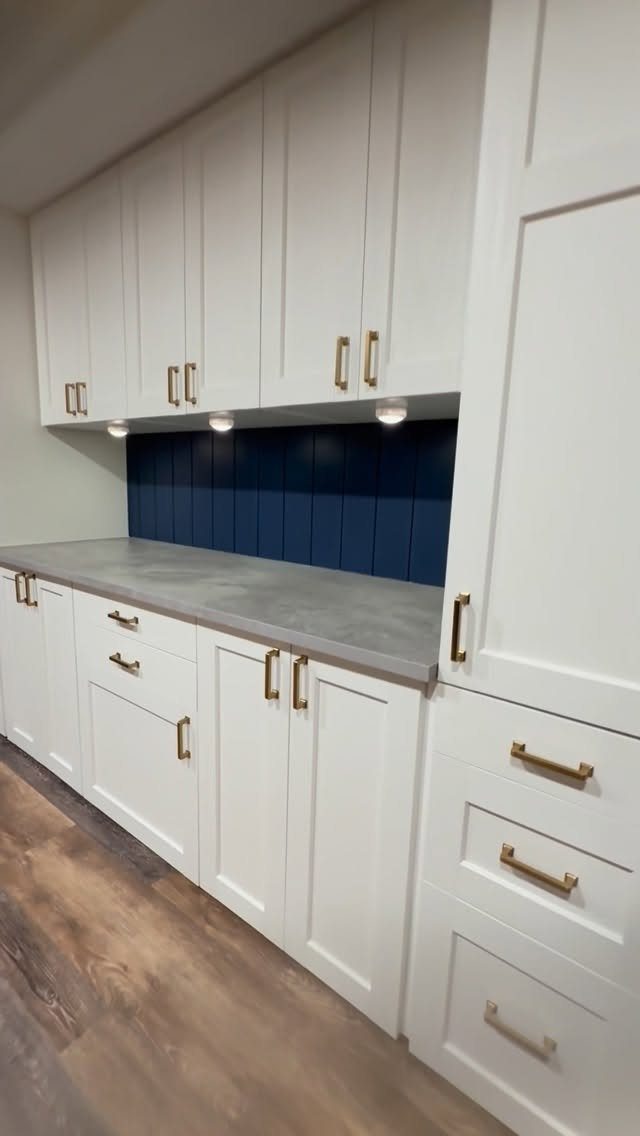
Vertical slats add rhythm to a wall that flat tile or paint would leave blank. Dark blue slats run floor to counter, spaced close enough to read as texture from across the room, far enough apart to wipe clean behind.
Shaker cabinets with simple hardware keep the slats from feeling busy. The pairing works because the cabinets are white and flat-faced where the backsplash is dark and dimensional; swap both to ornate and the room tightens up.
Puck lights under the cabinet edge graze the slats and cast small shadows between them. That is when the texture shows; without the lighting, the wall reads as solid color and you lose the point of the labor.
Wood slats, painted, need sealing in a basement kitchen where steam and splatter are part of the job. A satin or semi-finish wipes easier than matte.
Best for the reader who wants one custom-looking element without the custom price. The cabinets stay standard; the backsplash carries the design.
19. Textured Tile Backsplash
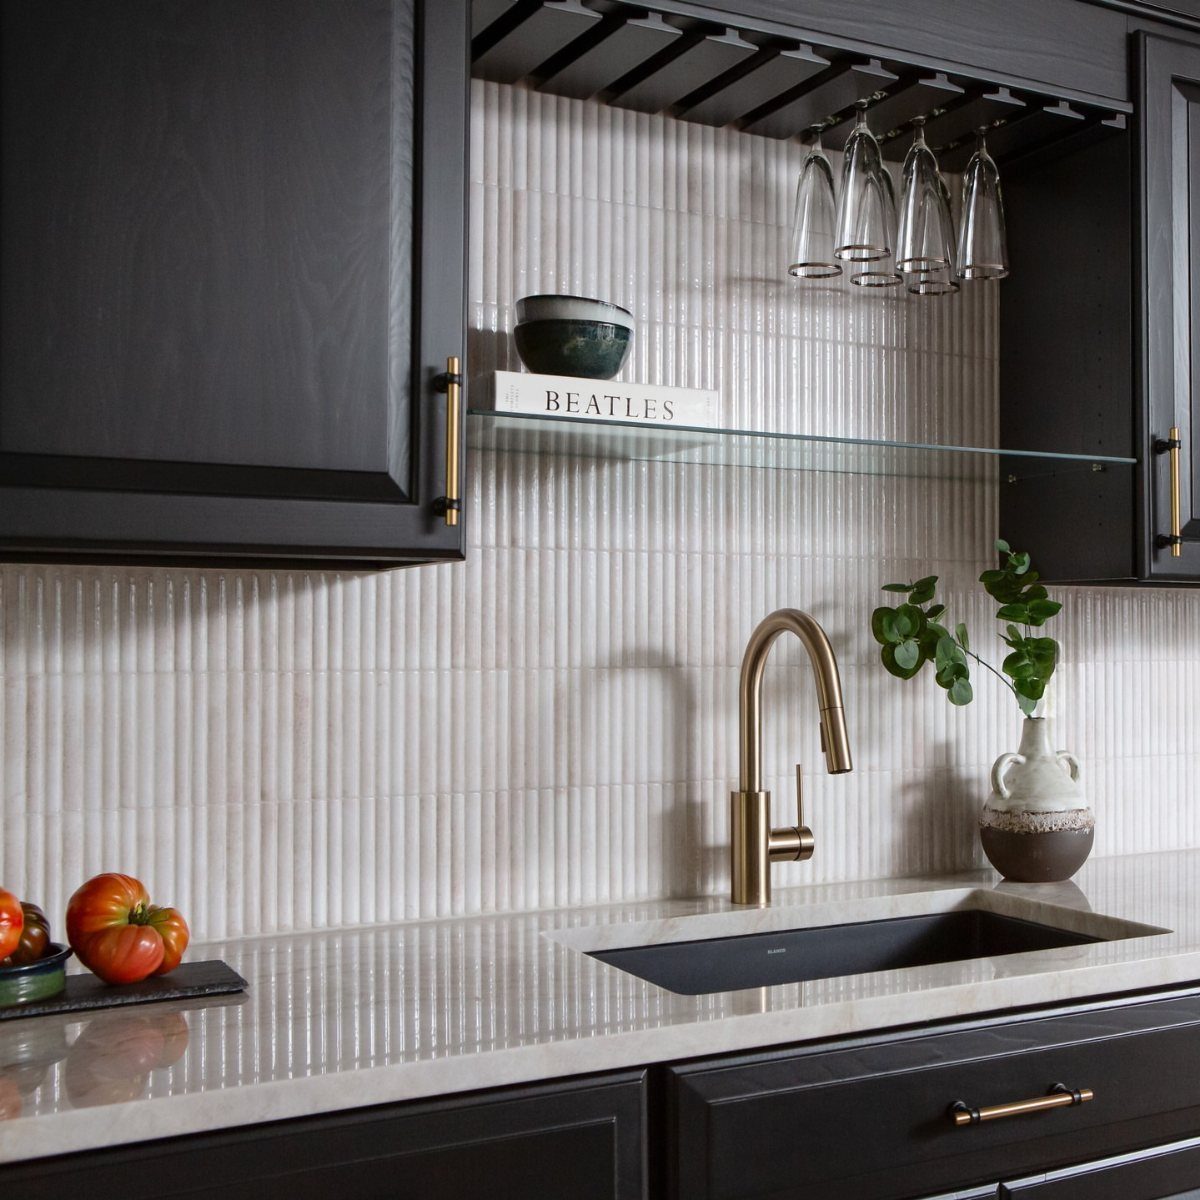
Textured tile gives a basement kitchenette the surface interest that flat paint or standard subway tile cannot match. Vertical fluted or ribbed tiles catch light from under-cabinet strips and cast small shadows that read as movement across the wall.
Black or dark cabinets set the tiles off best; brass or gold hardware warms the pairing. Textured tile costs more than basic ceramic, but it does the work of art without a separate piece to frame.
Installation takes the same time as any tile job, though the ridges need slightly more attention at grout lines.
A glass shelf mounted at eye level keeps the texture visible rather than hiding it behind storage.
This suits someone who wants the wet bar to feel designed rather than assembled, and who will wipe the ridges down occasionally; dust settles there.
20. LED Ceiling Accent Lighting
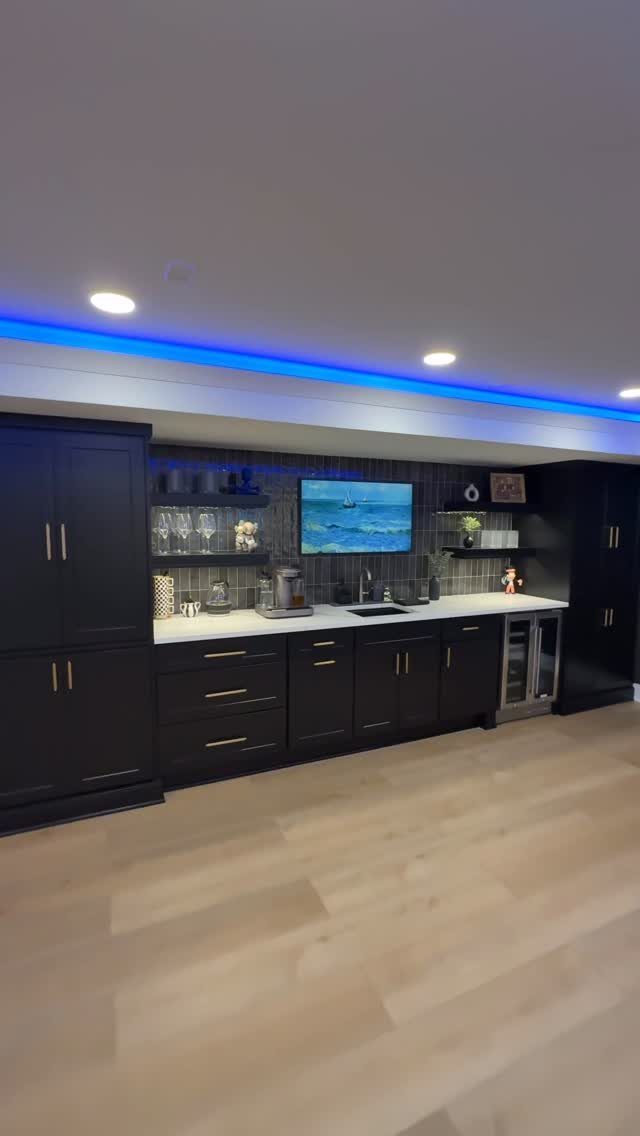
Blue LED strip lighting tucked into a ceiling cove turns a low basement into something that reads as lounge rather than afterthought. The color is the choice: warm white under cabinets for working, a colored perimeter for mood.
Three layers handle what one overhead fixture cannot. Slim recessed LEDs fit shallow joist bays and give general light.
Strips under upper cabinets kill the shadows your body casts when there is no window behind you. The cove color, controlled by a switch or remote, shifts the room from snack prep to evening seating without changing a bulb.
Keep all white light at one warm temperature, 2700K or 3000K, so the room feels consistent when the color accent is off.
The LED strips themselves run cheap; the cost is in the channel, the driver, and an electrician if you are not comfortable with low-voltage wiring.
This suits someone who uses the basement as both kitchen and hangout space, and who wants the switch to feel instant.
Cost Factors
A basement kitchenette can run from a few thousand dollars past $45,000. The spread comes down to three things: whether plumbing already exists, what appliances you choose, and how far you push the finishes.
Appliances are where you control the number. Top-of-the-line units run into the thousands, but a basic refrigerator and a small cooktop keep the budget in check for a space that sees weekend use more than daily cooking.
A contractor who measures the basement and checks the plumbing and electrical first will give you an estimate that holds up.
Plumbing fixes come first; moisture in a basement turns small leaks into big problems, and that correction goes into the starting number, not the surprise column.
Plumbing and Electrical Needs
Water and power have to reach the space before anything else happens. A basement roughed in during original construction saves money on the plumbing and electrical runs.
If you are cutting concrete to add a drain or pulling new wire from the panel, the budget shifts fast.
A contractor can map what exists and what the code requires. In a finished basement, that means checking whether the existing lines can handle a refrigerator, a microwave, and a small cooktop without overloading.
For plumbing, the slope to the main drain matters; pumps add cost and maintenance.
Get the infrastructure assessed before you order cabinets. A kitchenette built around the pipes and wires you have costs less than one built around the layout you drew first.
Maintenance Considerations
Non-porous materials let those messes sit without staining or demanding a fresh coat of sealer. Quartz skips the resealing schedule entirely, and its quieter patterns keep a tight space from feeling busier than it is.
Vinyl flooring holds up against the humidity that rises through basement concrete. It cleans with a mop and does not warp when the damp season hits.
I would pick materials that forgive neglect. A basement kitchenette often sits idle for days, then sees heavy use when you entertain.
Surfaces that need constant attention or special cleaners turn into a chore you skip.
Frequently Asked Questions
How much does a basement kitchenette cost?
A basic basement kitchenette runs a few thousand dollars if plumbing and wiring are already in place, while a full build with new utilities averages around $45,600.
IKEA’s prefab cabinets start around $108, and butcher block runs cheaper than quartz by the square foot; swap one material for another and the whole budget moves. Doing your own work where code allows drops the price further.
What are the trends in basement design for 2026?
More cities are letting homeowners add separate rental units, so basement kitchens built for tenants or aging parents are showing up in places that used to ban them.
Space-saving appliance tech and palettes like sage and blue are showing up in new builds. The kitchens that last below grade work with low ceilings, little daylight, and damp concrete instead of trying to wallpaper over those facts.
Can you put a kitchen in your basement?
Yes, but it needs valid permits for construction, plumbing, electrical work, and ventilation to meet code. A second kitchen may require rezoning the home.
Proper ventilation matters especially; basement humidity finds every gap in appliances, so sealed controls and models rated for damp air last longer.