No-carve pumpkin decorating ideas span from ten minutes of stickers with a toddler to an afternoon gilding leaf onto heirloom shapes, and the single question that picks your method is how long the finished piece needs to survive.
Real pumpkins rot in weeks even unpunctured, while a sealed coat of acrylic paint on a foam stand-in waits in storage for next October; choose wrong and you are either carving a replacement before Halloween or storing a heavy fake until next year.
Finger paints with taped stencils, gauze mummies, and washi tape that peels clean for endless redesigns all share the same advantage: no knife opens the skin, so no rot starts inside.
1. Finger Painted Pumpkins
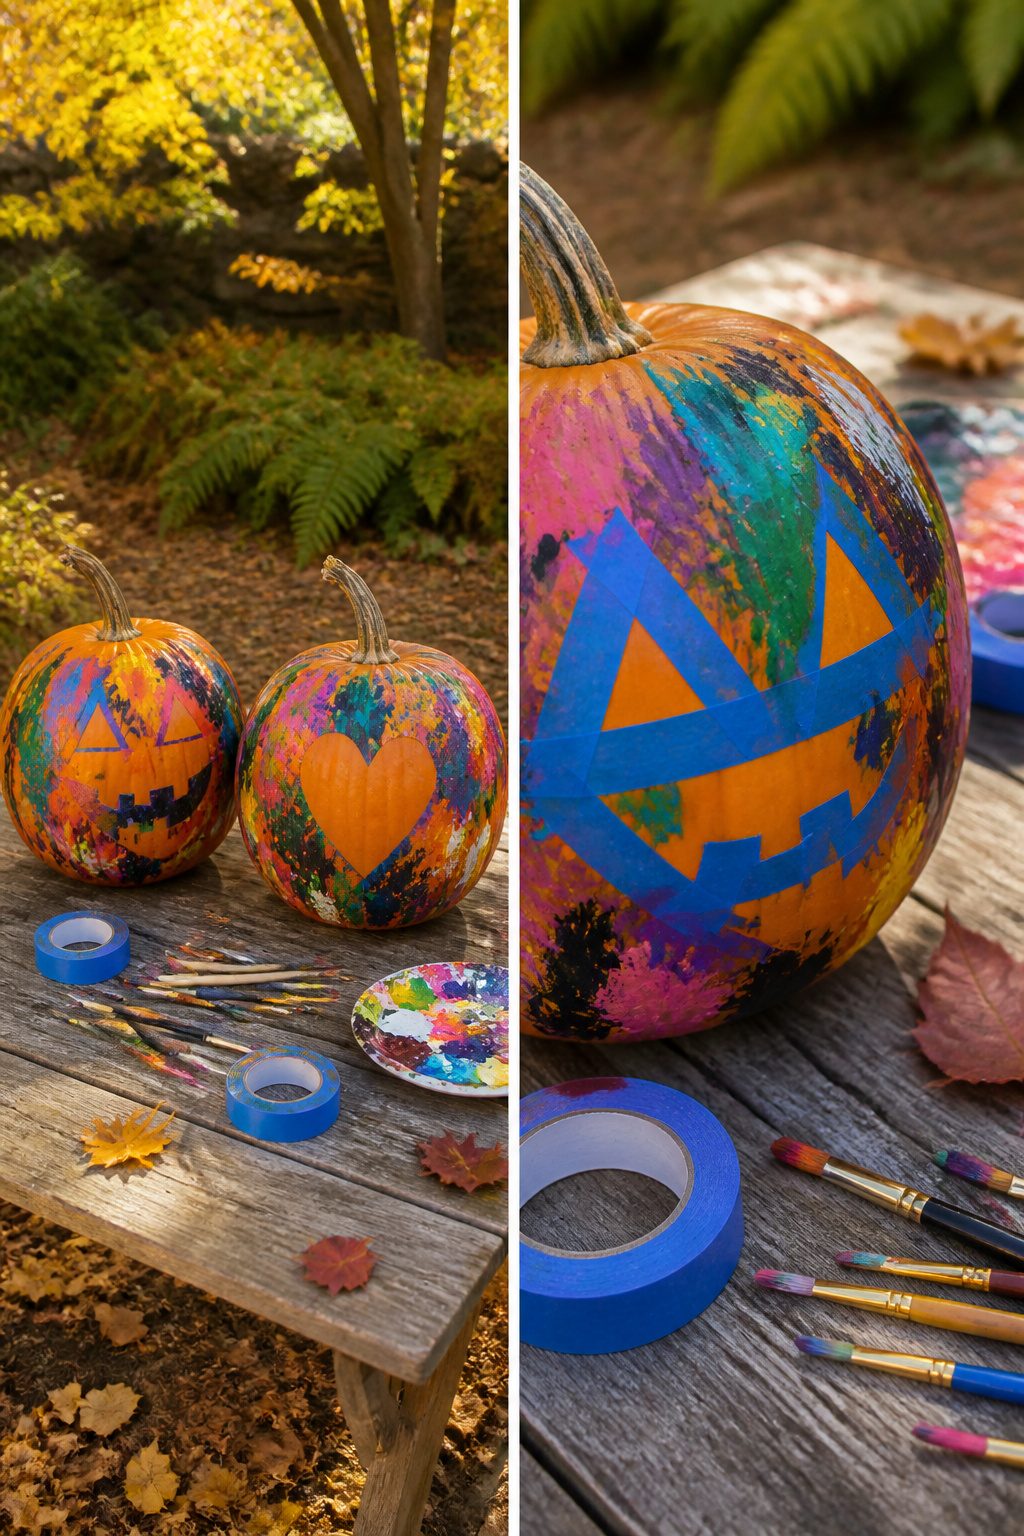
Finger paints and pumpkins are a natural match for toddlers who already treat every surface like a canvas anyway.
John and Sherry from Young House Love built the setup so the result actually looks intentional: they ran painters tape over the shape of a "P" and a simple pumpkin face, pressing the edges down hard.
Their daughter painted over everything, tape and all, with the same sloppy enthusiasm toddlers bring to any project. Once the paint dried, they peeled the tape back and the blocked-off shapes stayed clean orange against the painted background.
The tape does two jobs at once. It gives small children a wide target they cannot miss, and it buys the grown-ups clean edges without any correction afterward, which matters when your painter is more interested in volume than precision.
A craft knife helped them cut the tape shapes tight to the pumpkin’s curved surface.
They noted later that faux pumpkins would have let them keep the finished pieces for another year, a useful save if you are already buying supplies for more than one season.
2. Mummy Pumpkins
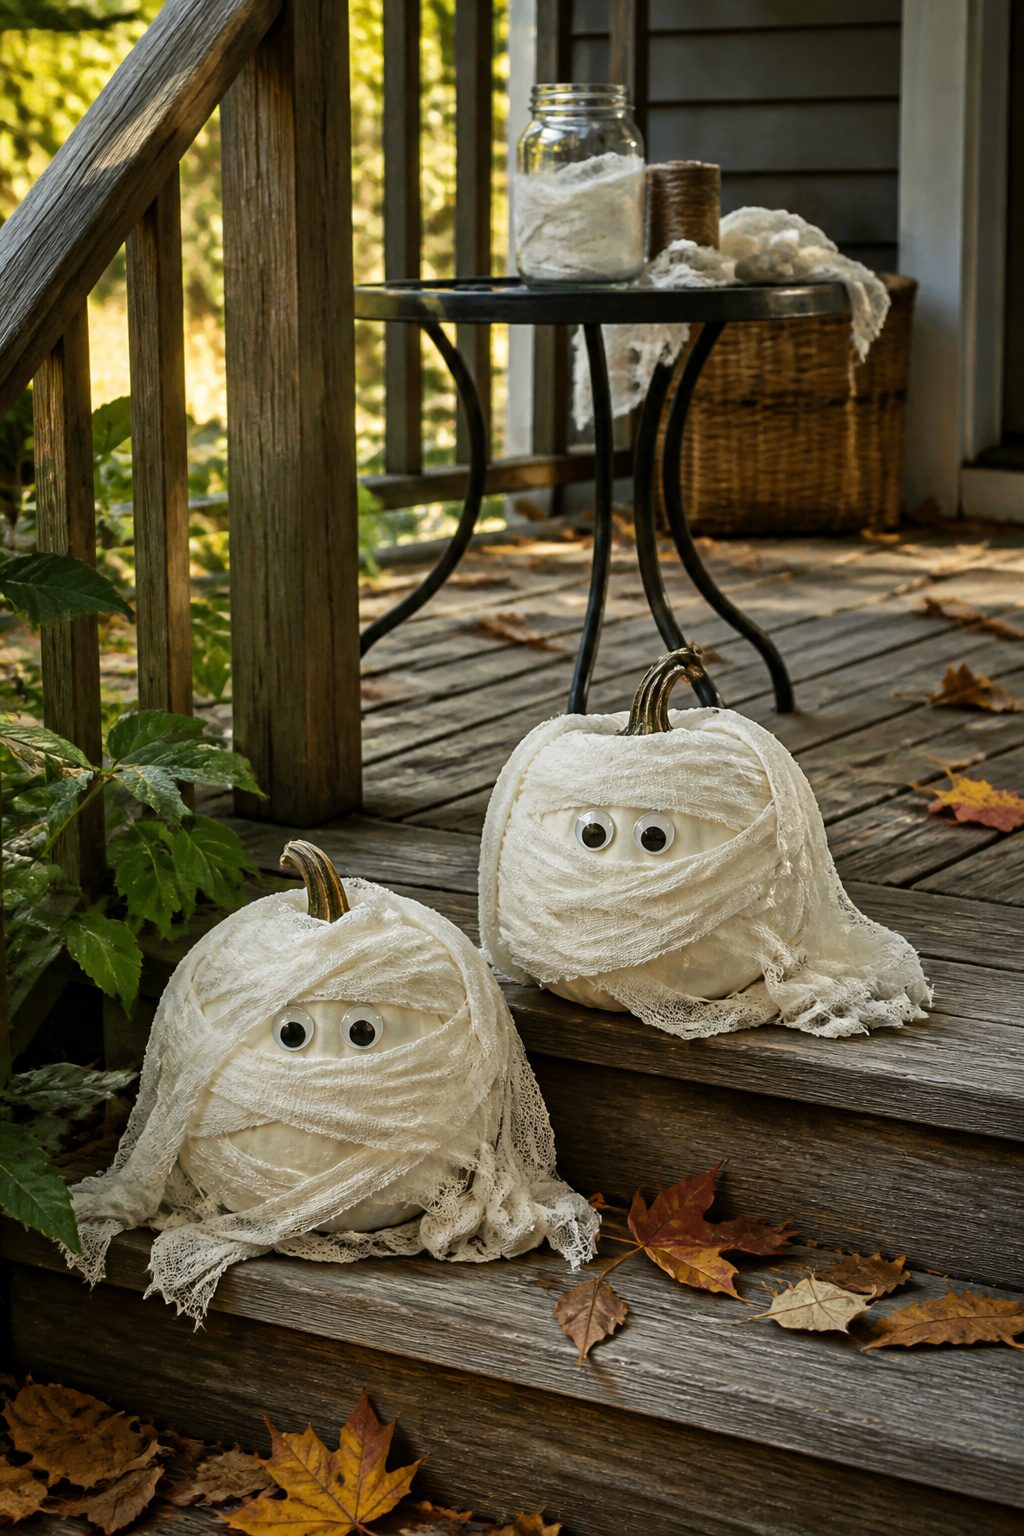
A small white pumpkin, a roll of gauze, and a hot glue gun are about all this asks for.
The gauze strips get wrapped around the whole pumpkin, working from stem to base or the other direction, and the strips stay put with dabs of hot glue where they want to slip or lift.
Leave a narrow slit open in the front so the jar of googly eyes can sit right there, catching the light like whatever mummies have left underneath.
The rhythm that works is loose wrapping rather than tight. Tight turns read more like surgical dressing; loose turns read like bandages coming undone, which is the look.
Two or three layers in some spots give the right rumpled depth without burying the pumpkin shape entirely. Hot glue goes on the back side and tucked spots, not across the face, since dried glue shows through thin fabric.
If the pumpkin will sit on a porch where nights drop toward freezing, craft glue softens and lets go. Hot glue stays set through colder nights than most no-carve pumpkins see.
Between that and zero sharp tools, this is one of the options toddlers can genuinely help with, pressing eyes into glue you line up for them or wrapping strips around their chosen pumpkin while you anchor the ends.
3. Floral Pumpkins
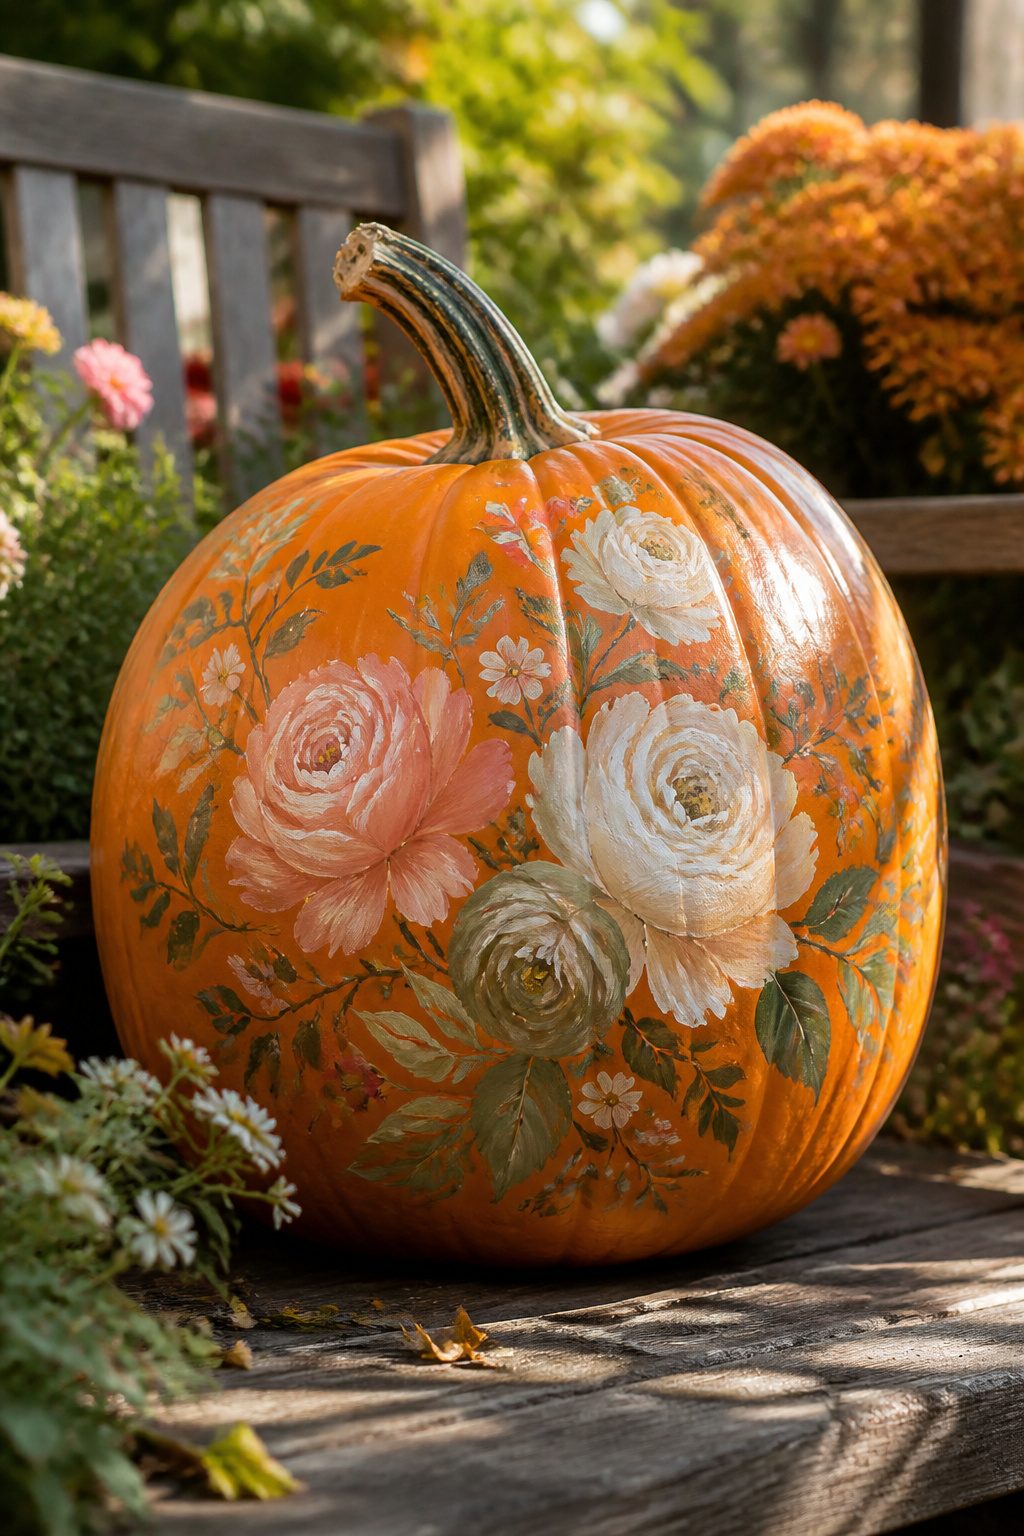
Acrylic paint is the only paint that makes sense for hand-painted flowers on a pumpkin.
It grips the waxy skin, dries fast enough that a leaf painted at ten o’clock won’t smear by noon, and comes in enough colors to mix a decent sage or faded rose.
Oil paint takes too long to dry and watercolor is too transparent to read from across a table.
Leave breathing room between stems for a dainty cottage look, or crowd them until the pumpkin looks like a wildflower meadow thrown in on itself.
Either way, the pumpkin itself stays whole, so the flesh does not open to rot the way a carved jack-o’-lantern does.
Kept out of direct rain and sun, a painted pumpkin can last two to three months, often the full season and beyond. A clear acrylic spray seal helps if the pumpkin will sit outside through weather.
4. Animal Pumpkins
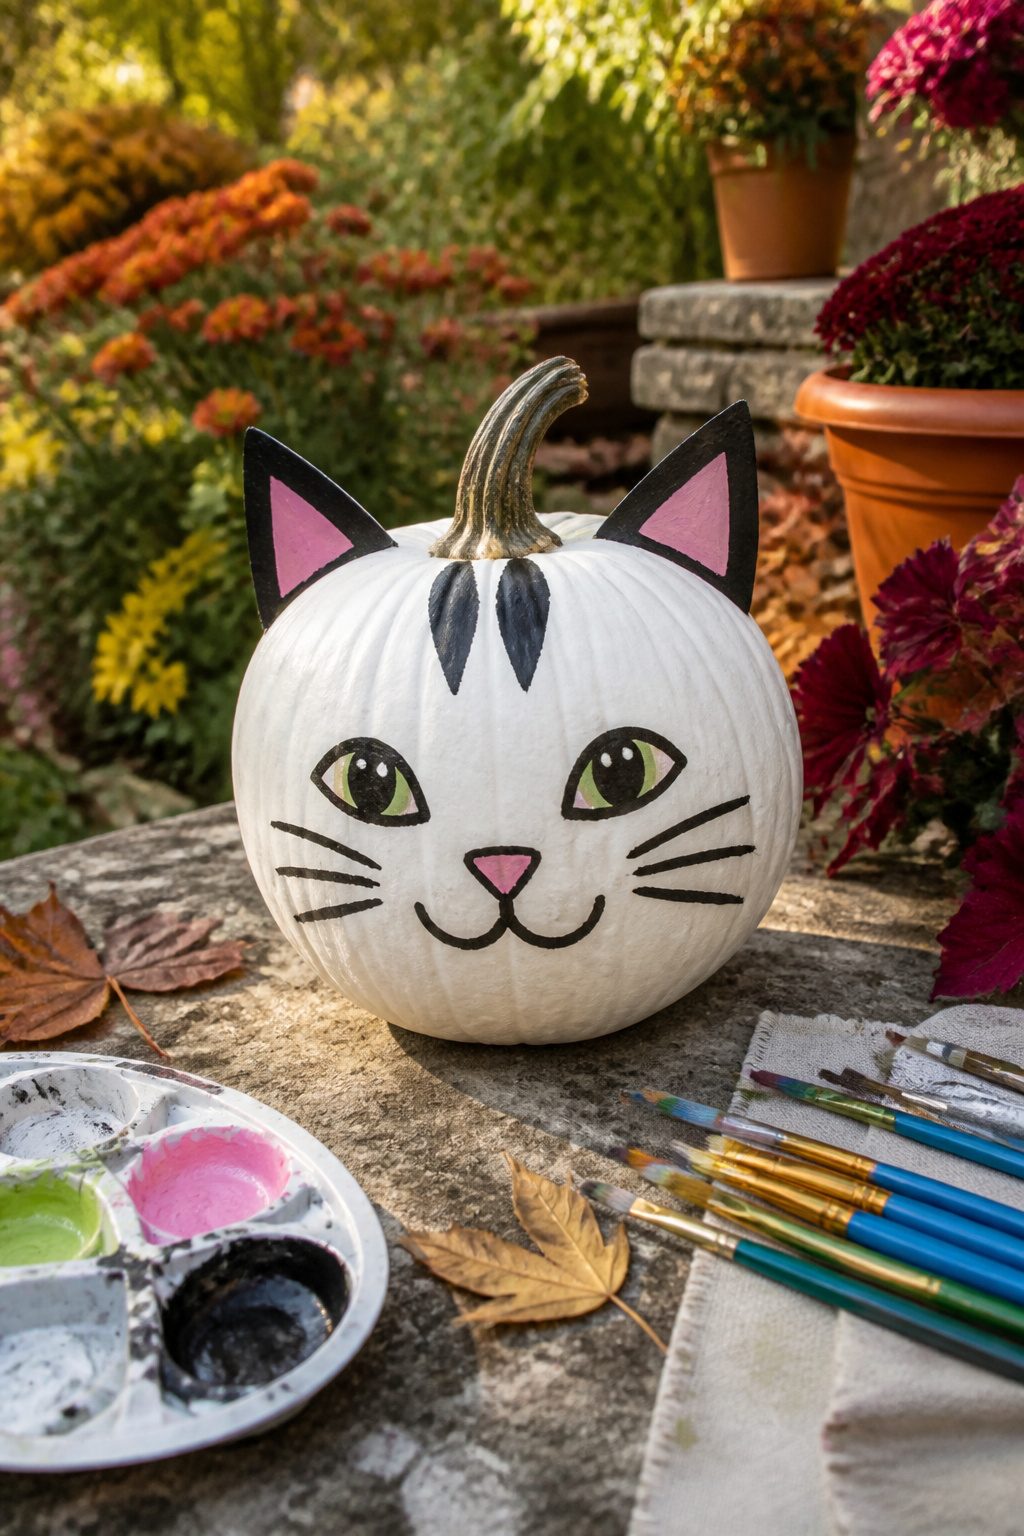
White pumpkins take acrylic paint better than orange ones, so a flat white Lumina or Cotton Candy is worth the hunt.
Last season I watched a three-year-old cover one in thick pink blobs that, with a quick nose and eye added after drying, became a llama anyone could name.
Classic brushes give softer edges; paint pens control the line for whiskers and spots. Black, orange, and yellow pens handle the small work of noses and hooves without the setup of a brush cup.
A cat starts with two triangles and a tail. A cow needs only a spotted puddle of blue or black and a pair of ears.
Both work because cartoon animals forgive wobble; the charm is in the obviousness, not the precision. Kids manage the shapes with help on the outline, adults can layer detail onto the same base.
Either way, seal the finished pumpkin with clear acrylic spray if it will sit outside, or the rain lifts the paint in soft streaks you did not plan.
5. Food-Themed Pumpkins
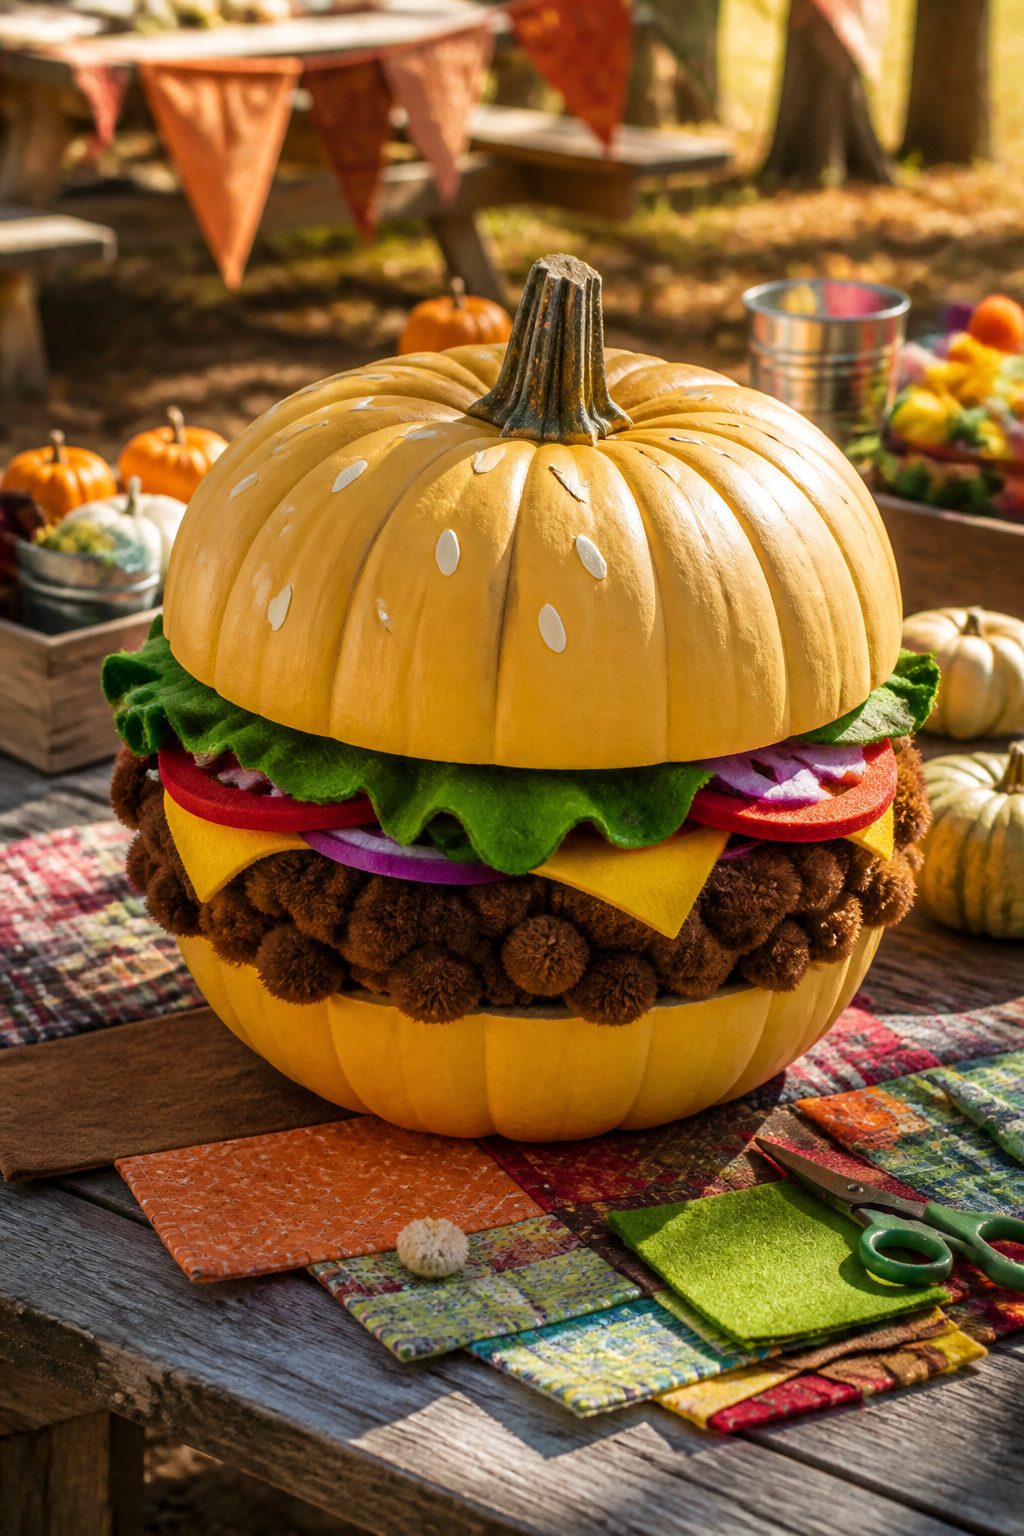
A cheeseburger pumpkin sits in the weird overlap of Halloween and late-season cookouts, which is exactly why it works.
Paint the whole pumpkin a soft bun yellow, then layer craft felt or foam in ruffled lettuce green, tomato red, and that muted orange-brown that wants to be American cheese.
Brown pom-poms pressed into the midline read as a smashed patty better than you’d expect. One version glues sesame seeds across the lid and sticks monster-finger gummies to the sides for a joke that lands with kids under ten.
The pizza pumpkin and donut variation follow the same build: flat circles of craft foam for pepperoni or glaze drips, a thick coat of craft paint underneath. ** This no-carve pumpkin is less mess and will last so much longer than a carved pumpkin **, which matters when you’re staging a porch in early October and don’t want a collapsed jack-o’-lantern by the fifteenth.
Only a couple of sources focus specifically on food-themed builds, so the idea stays distinctive at a distance; your neighbor will have the carved cat, not the Whopper.
Printable templates for cheeseburger layering do exist if freehanding the felt curves sounds like a Saturday you don’t want to spend.
6. Sticker Pumpkins
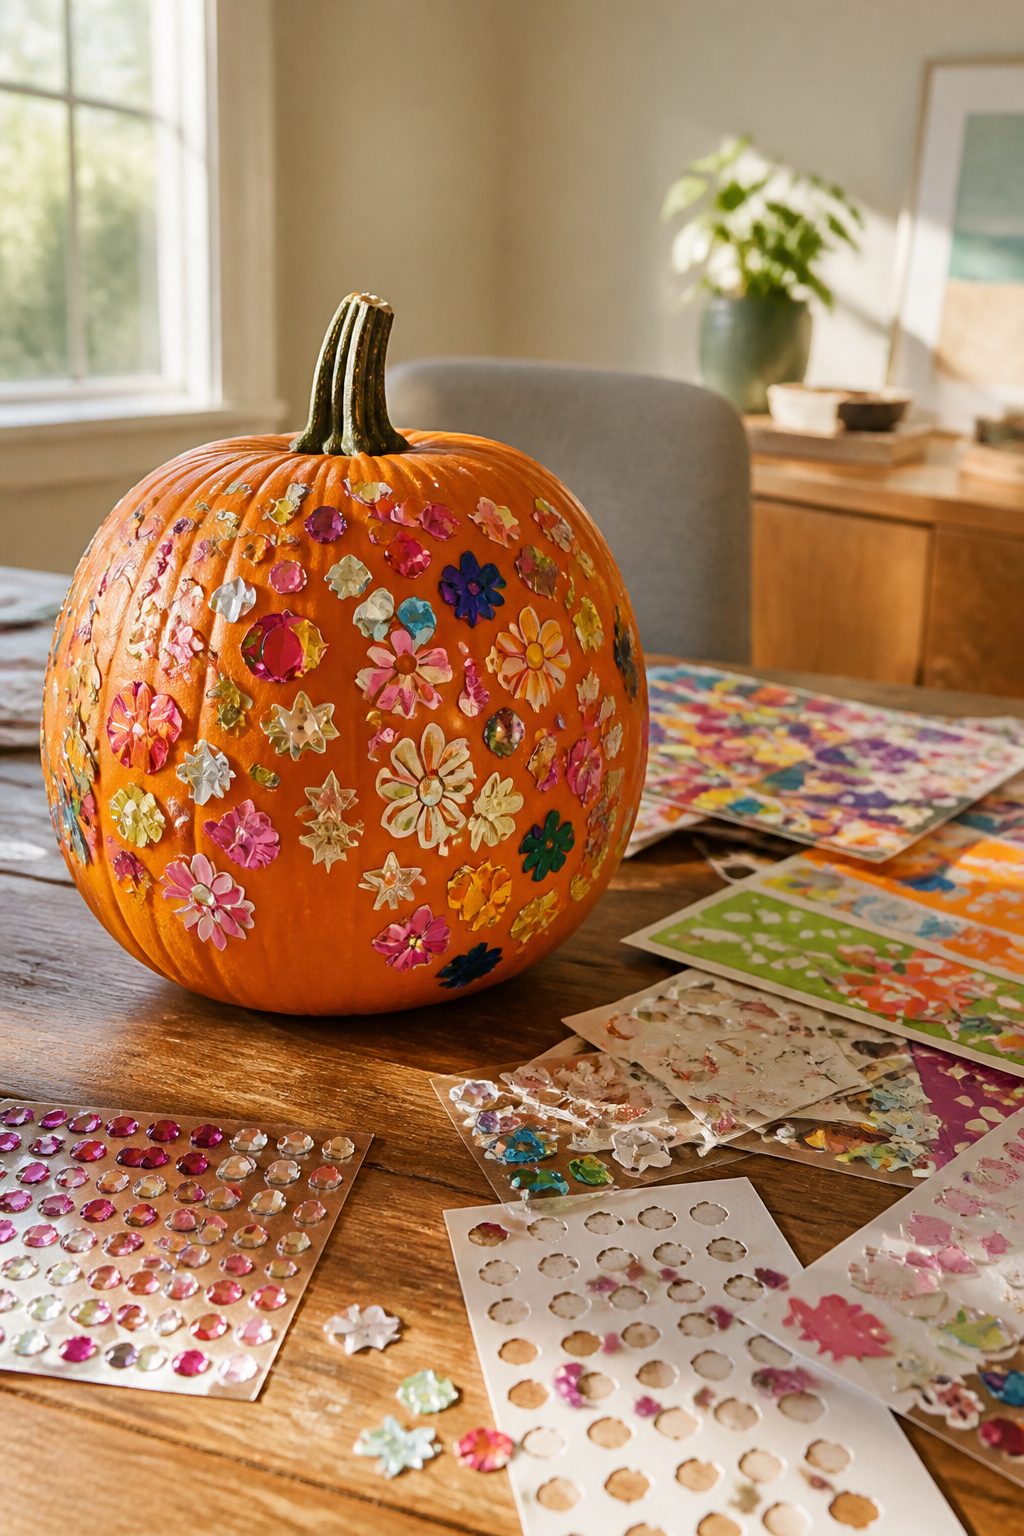
Kids stick their sticker collections directly onto the pumpkin however they like. This is one of the easiest options for children, and it requires no drying time or cleanup at all.
The appeal runs across ages. Toddlers managing their first peel-and-stick moment get the same result as older children running a dense collage across the whole surface, because the pumpkin does the visual work.
Its shape and color already read as finished.
The materials are already in most homes. Sticker collections, spare sheets from craft-store runs, even vinyl decals ordered online for a few dollars all adhere fine to a wiped-clean rind.
I have watched children abandon a project the moment paint needs drying time. Stickers let them set the pumpkin on the porch immediately, which matters when a three-year-old wants to see the thing done.
For maximum effect, a painted base helps. A coat of bright color underneath turns scattered stickers into deliberate pattern.
But plenty of children skip that step entirely, and the result still registers as decorated. The only real judgment call is placement: random scatter or planned face.
Both work. The mistake is directing too much, since the whole point is that no skill is required.
7. Decoupage Pumpkins
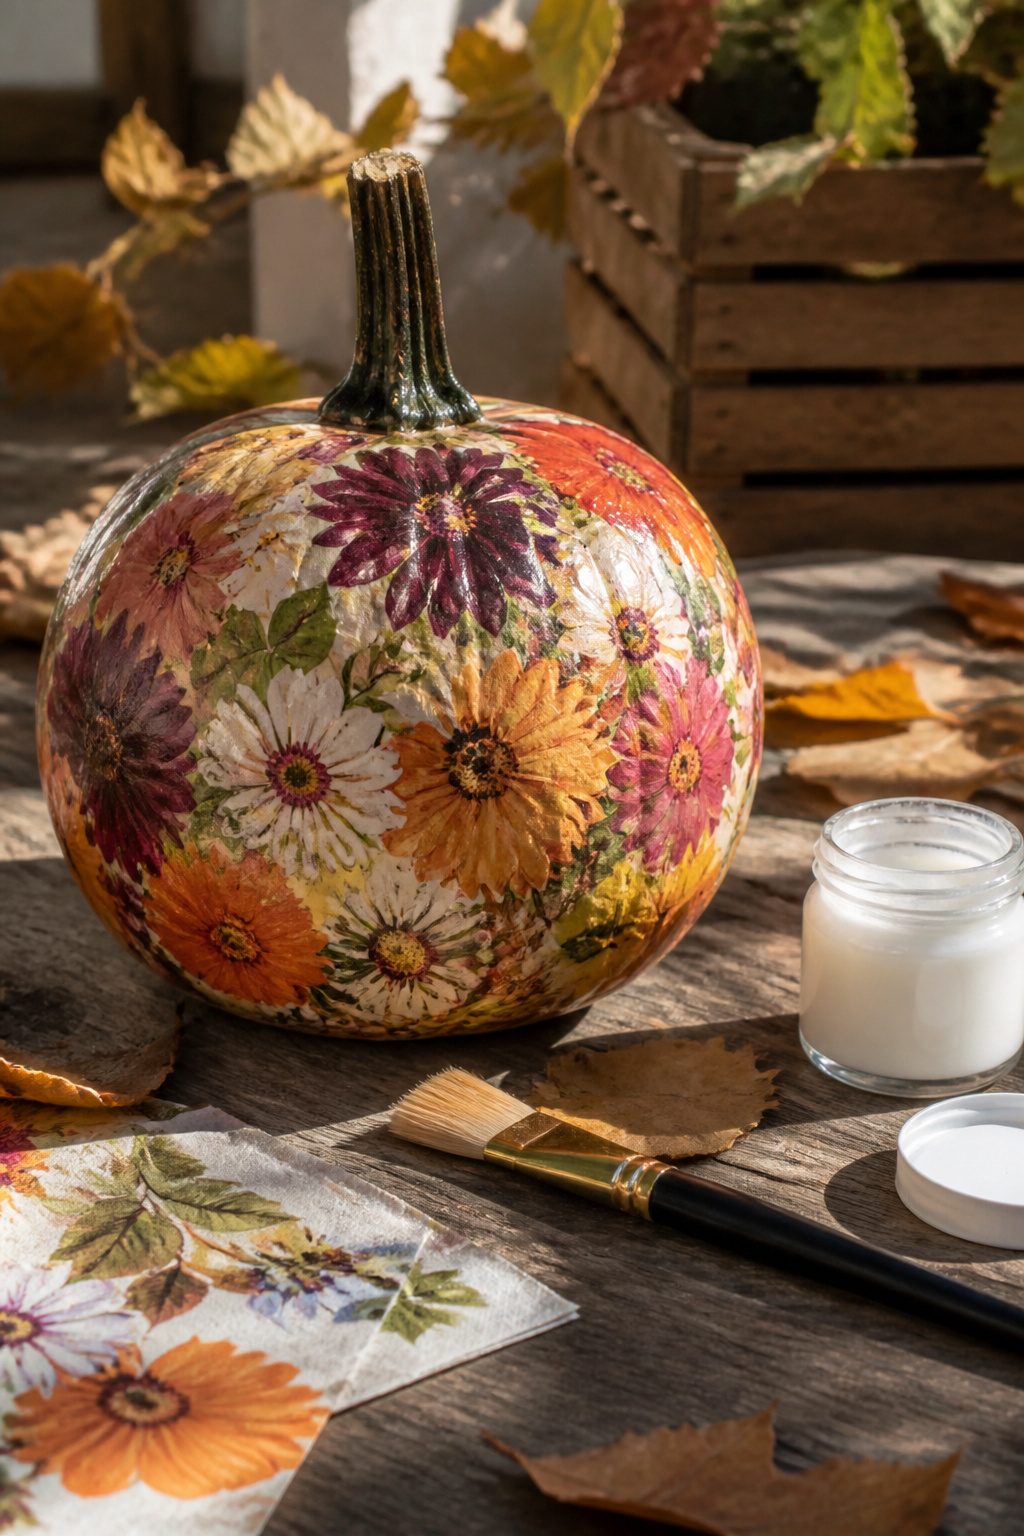
Paper napkins and decoupage glue turn a pumpkin into something that looks finished enough to sit on a dining table rather than a front stoop.
Mod Podge is the name that comes up because it dries clear and brushes on without ripples, which matters when the whole surface is pattern.
The technique is straightforward: separate the printed ply from the plain backing layers so only the thin top sheet adheres, brush a coat of glue onto the pumpkin, lay the napkin down, and seal it with another coat on top.
A color photocopy of transferware or another pattern works the same way, cut into strips so the curved surface doesn’t pucker.
The result reads as decorated, not crafted, which separates it from the tissue-paper dots most of us did in grade school.
8. Painted Candy Corn Pumpkins
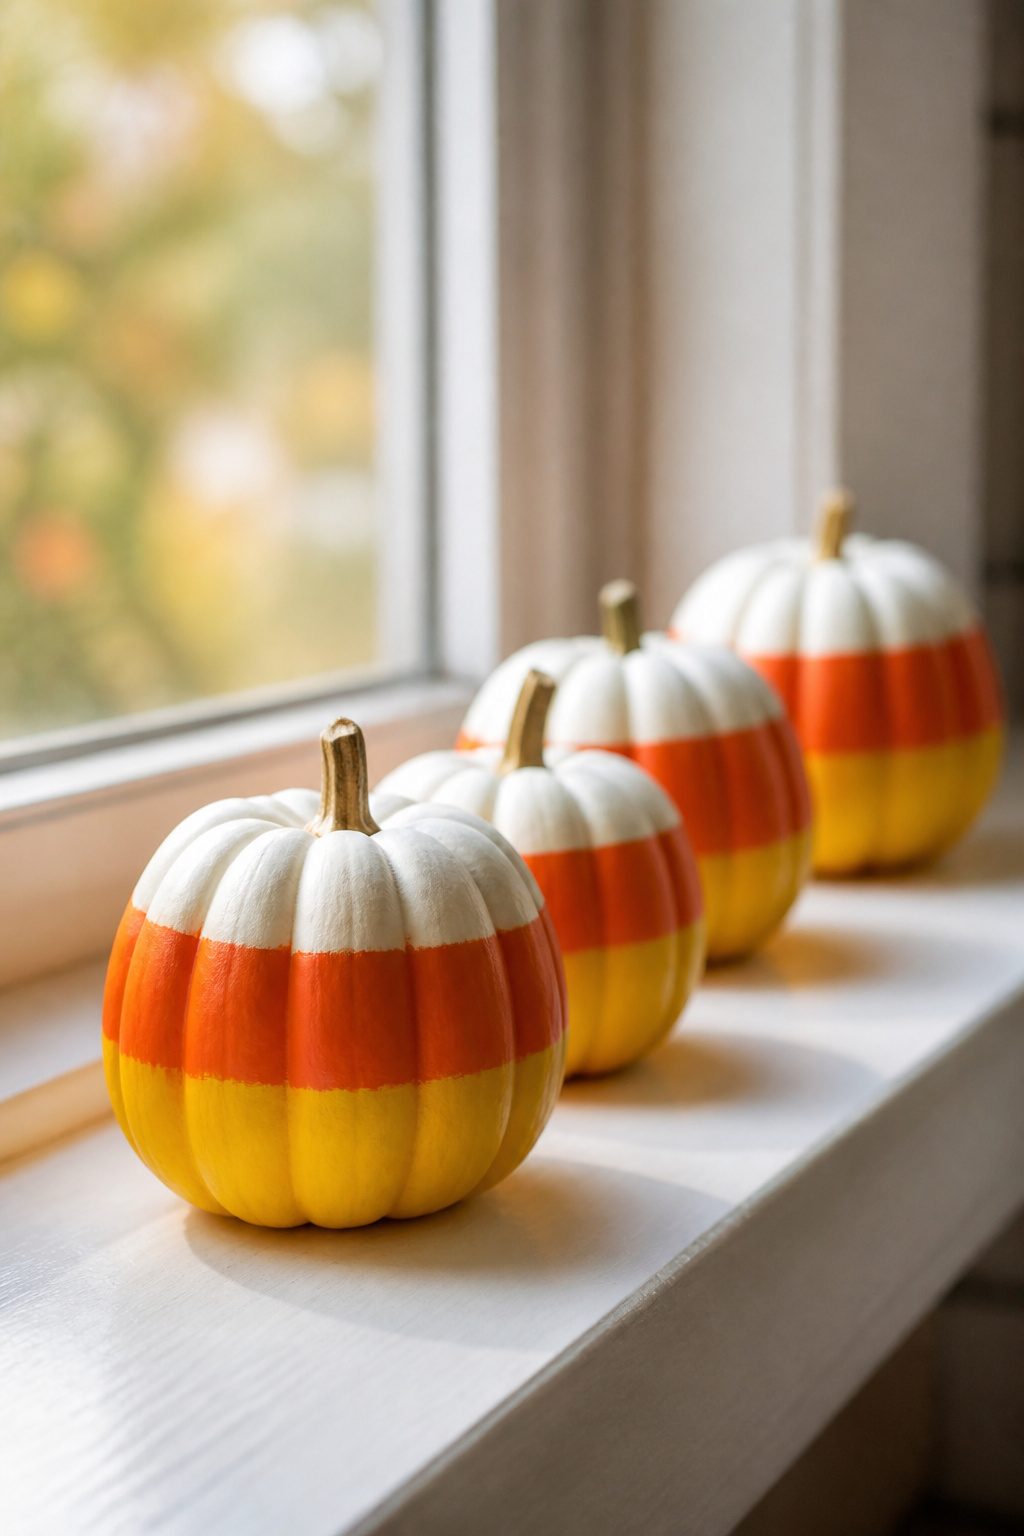
Mini white pumpkins from the craft store make the cleanest canvas for this.
Their pale skin saves one coat of paint right out of the gate, and at that size they sit neatly on window ledges or tiered trays without the bulk of full-size fruit.
The paint itself is standard acrylic craft paint, nothing specialty. Three bands give you the classic effect: a wide yellow base, a narrower orange middle, and the natural white tip already provided by the pumpkin.
The trick is letting each band dry fully before masking for the next.
Tape off your line with painter’s tape pressed to the skin, paint past the edge of the tape slightly so the seal stays tight, then peel before the paint sets completely.
The rind is slick enough that orange will bleed through soft edges if your tape seal is rushed, so check with a fingernail before loading the brush.
A clear acrylic spray sealer over the finished piece buys weeks of porch life, since painted pumpkins kept dry can last the full autumn season while carved ones start collapsing inside a week.
Two or three minis grouped in a cereal bowl cost less than one big carving pumpkin and read as Decoration rather than Project.
9. Gilded Pumpkins
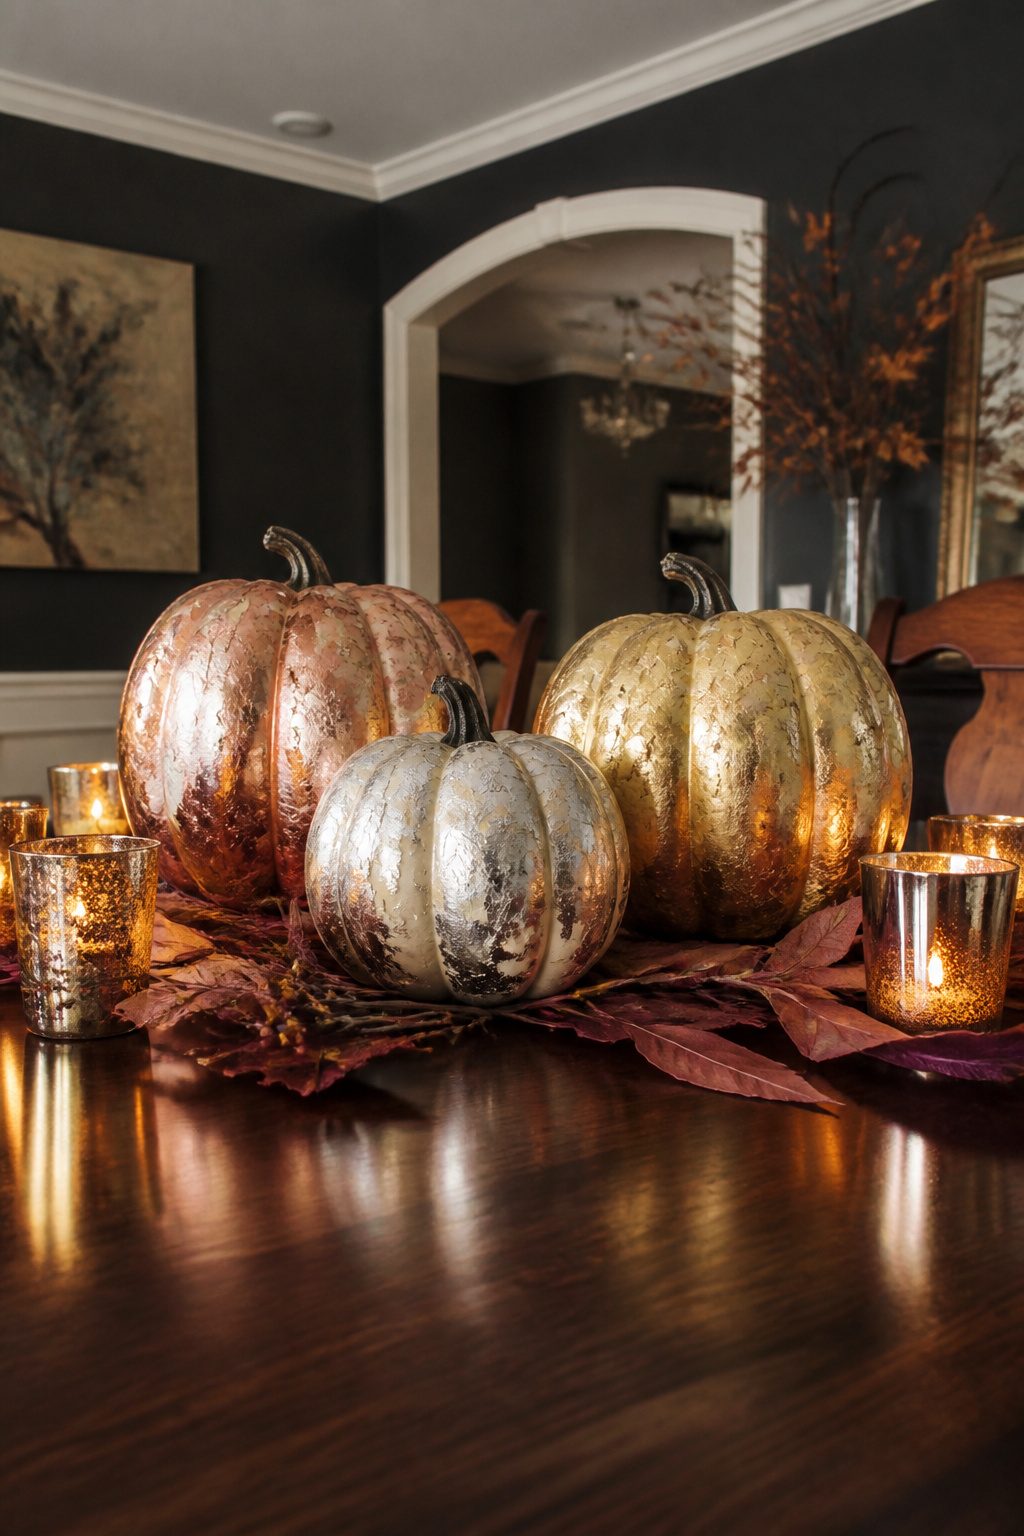
A gilding kit takes the guesswork out of this look, bundling copper, silver, and gold leaf sheets with the adhesive and sealer you need to apply them.
Mixing the metals, running silver against warm gold across the ribs of a pumpkin, reads more deliberate than a single shade.
The finish catches lamp light and candlelight in a way matte paint never manages, which is why this style works on a dining table or mantel where the rest of your fall decor leans formal.
Metallic spray works too, and spray cans are usually oil-based already. Oil-based paints stick longer on pumpkin skin than water-based ones that can bead or chip where the surface is waxy.
Whichever route you take, a clear acrylic sealant buys you those extra weeks of wear, especially if the pumpkin sits outside in frost.
Painted pumpkins kept dry and shaded typically hold two to three months, well past the five-to-ten-day life of anything carved.
10. String Art Pumpkins
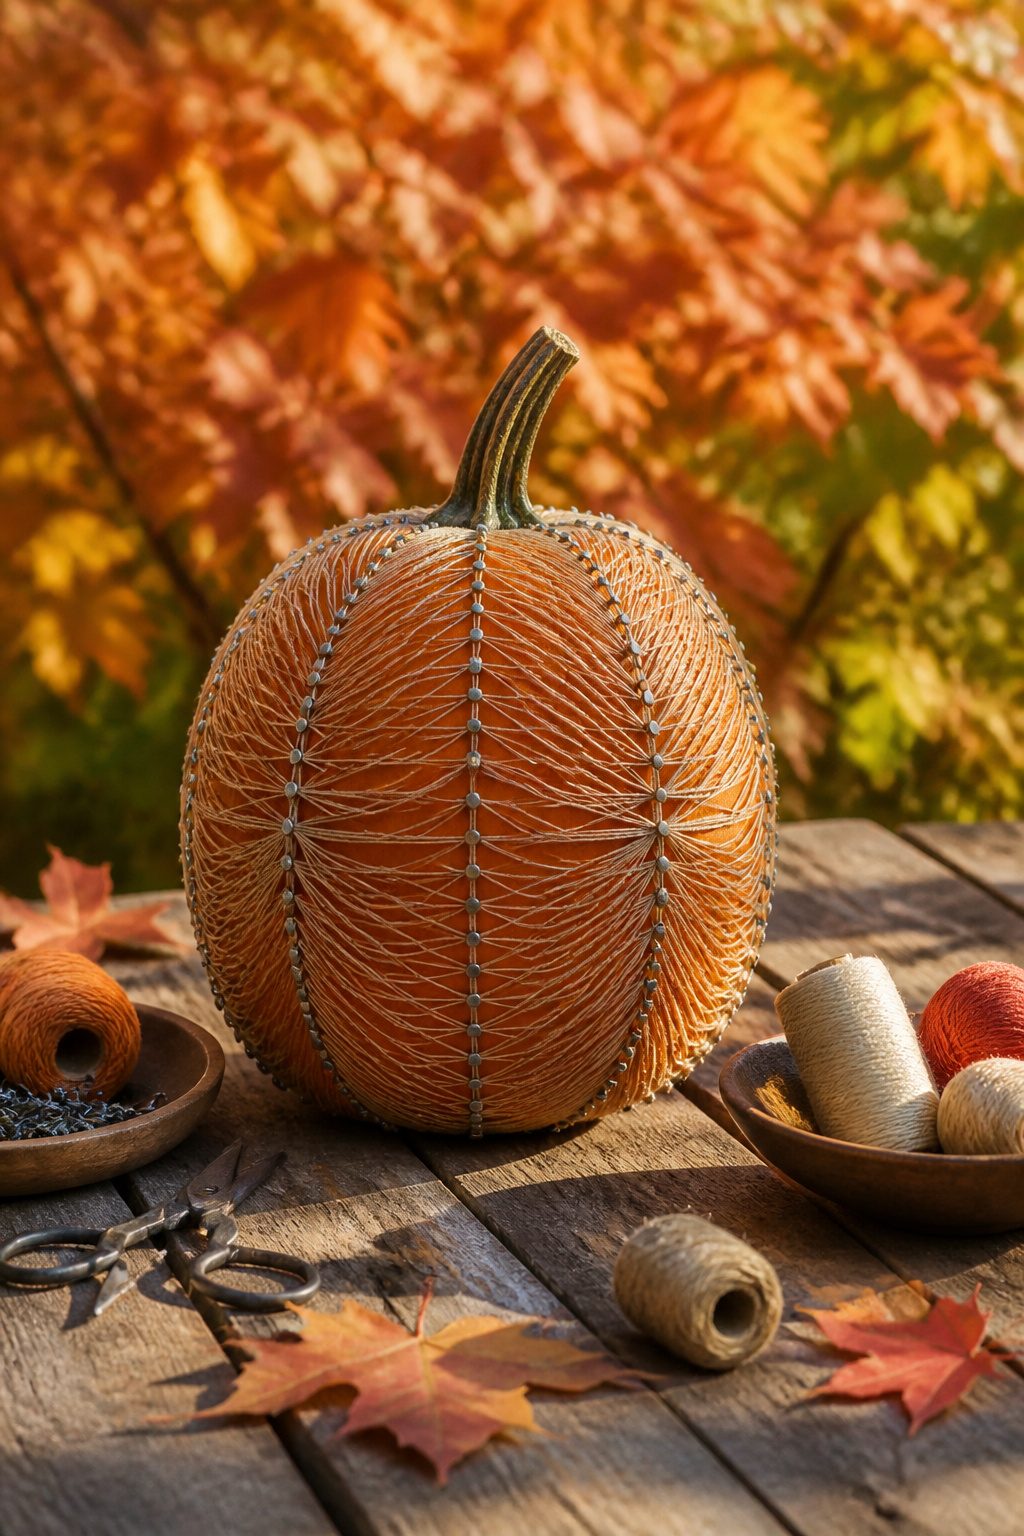
String art turns a pumpkin into a three-dimensional sketch you walk around.
A mechanical pencil pressed lightly against the flesh gives you the outline, then tap finish nails along that line with a small hammer, keeping them about half an inch out from the surface so the string has room to travel.
Fall florists’ wire, embroidery floss, or thin twine all work; the color is up to you, but a single shade against pale pumpkin reads cleaner than rainbow tangles.
The wrapping is where you decide between geometry and drift. Crisscross back and forth for a spiderweb effect, or let the lines wander between nails for something looser.
Either way, the hold is the tension itself, no glue necessary, and the nails stay put even if the pumpkin softens later in the month.
This one belongs to older kids and adults. Toddlers do not have the grip to seat a nail straight, and a slipped hammer swing against raw orange skin teaches a hard lesson fast.
I did string art first with a pre-teen neighbor who could manage the tapping but needed reminding to keep the spacing even; the uneven half she freestyled actually looked better than my measured rows.
Geometric or organic, the finished piece catches porch light in a way flat paint never manages, and the pumpkin underneath stays whole until you compost it or, if you used a fake one, pack it away for next October.
11. Neon Drip Pumpkins
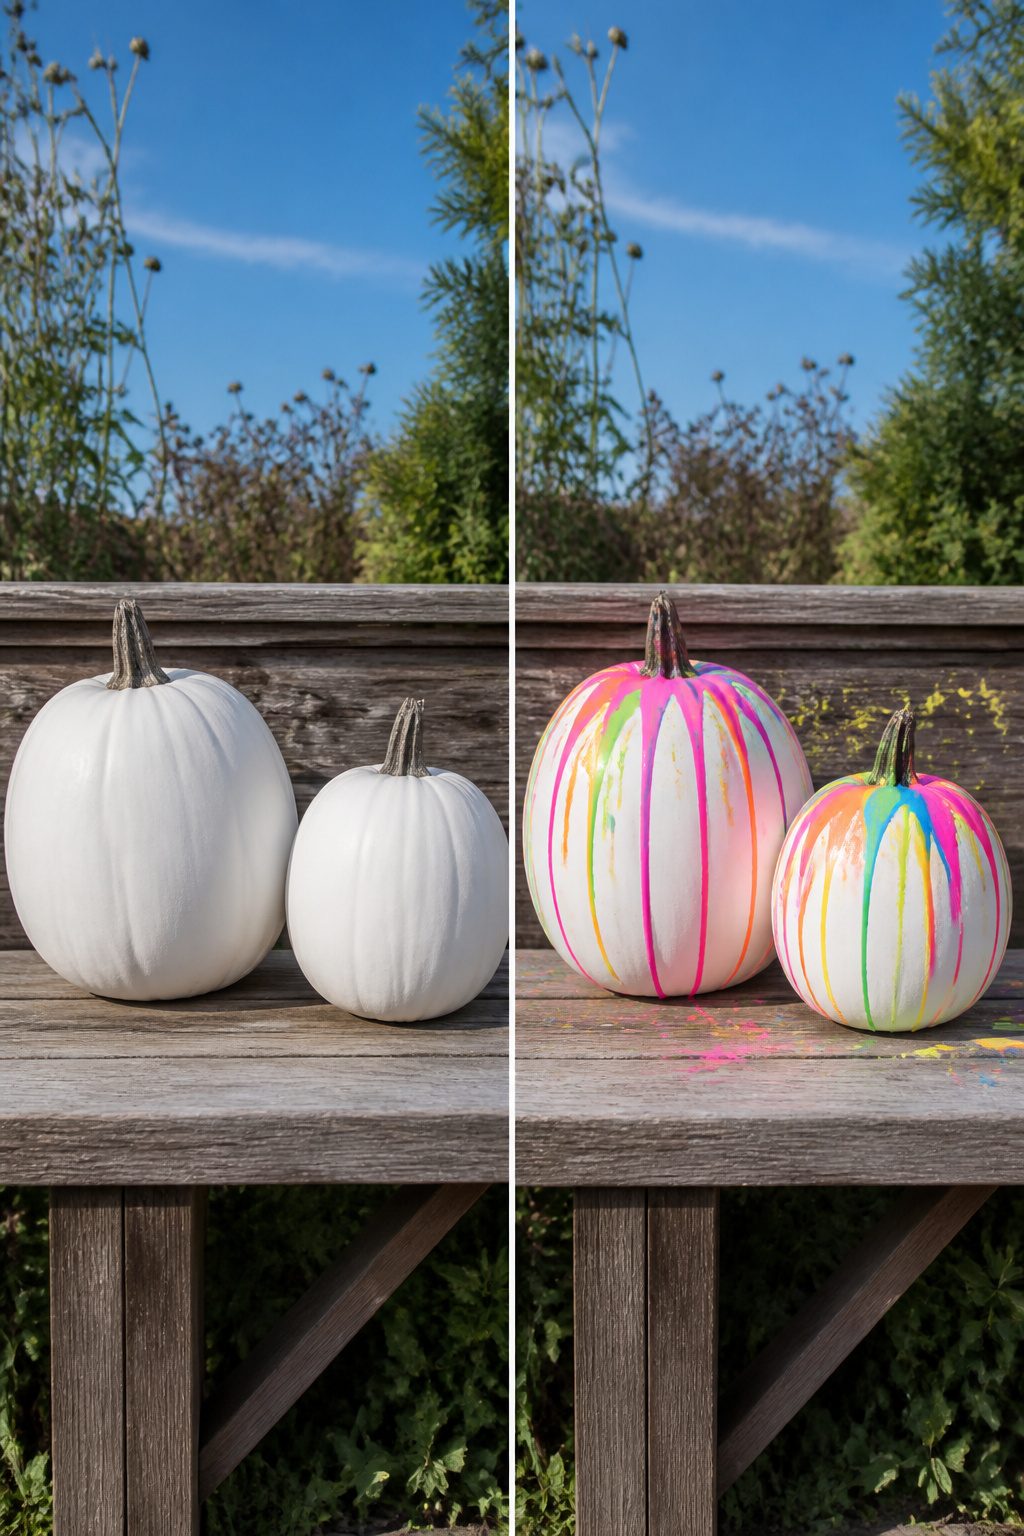
A white base coat makes neon paint read as daylight-bright rather than murky against orange skin.
I learned that the first time I tried drips straight onto an uncleaned pumpkin, and the coral I’d bought turned muddy pink where it touched the shell.
Clean up the surface with a damp cloth and a quick dry, then lay on two even coats of flat white acrylic with an hour between them.
Hold the painted pumpkin upright and let gravity do the work: load a brush, touch it to the stem or a high ridge, and let the paint run down on its own.
A thin acrylic will travel two or three inches before it sets; one that is too thick stalls or twitches.
For controlled drips, angle the pumpkin slightly and watch the first three seconds, rotating slowly so the stream follows the ridge you chose.
For an all-over run, keep the pumpkin level and add a second color only after the first has skinned over, or the two will muddy at the overlap.
Seal finished pieces with clear acrylic spray if they will sit outside. Painted pumpkins kept dry can last two to three months, against the five to ten days a carved one gives you.
12. Collage Pumpkins
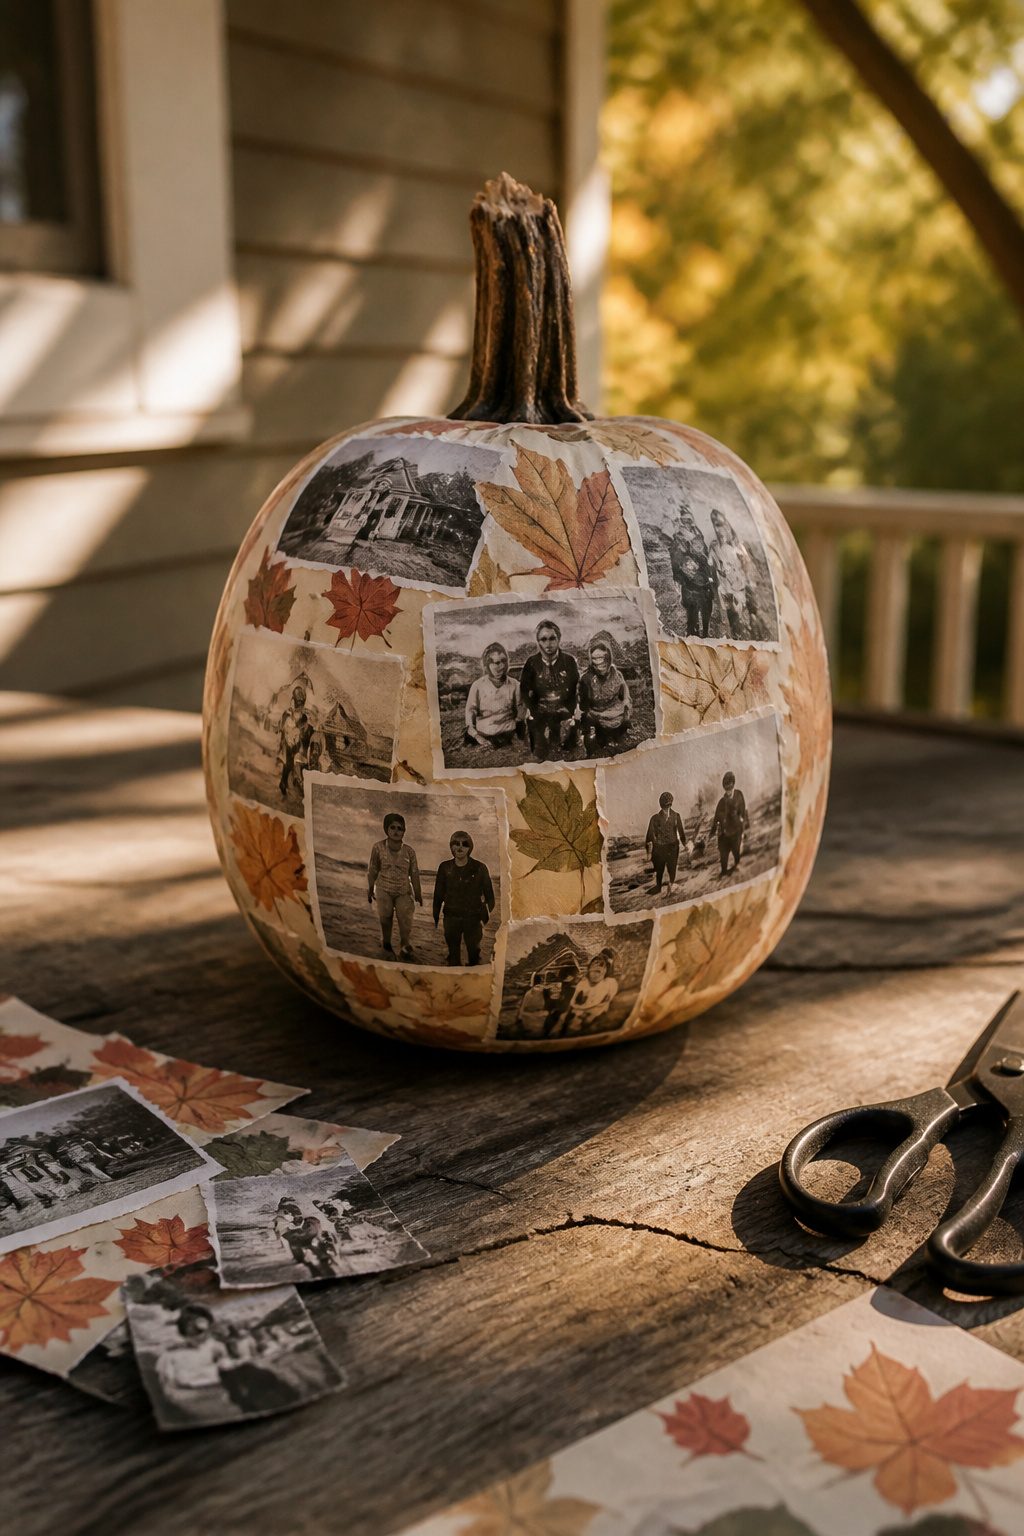
A collage pumpkin turns the whole surface into a frame for whatever you already care about. Black-and-white family photographs, clipped botanical prints, or leftover decorative paper all work.
Mod Podge serves as both adhesive and sealer: a thin layer brushed onto the pumpkin skin stays tacky long enough to position your pieces, then a second coat over the top locks them under a clear, hard finish once it cures.
Faux pumpkins hold up best for this, since the finished piece can come back out year after year without the paper warping or rotting on a decomposing shell.
Tissue paper and even patterned paper napkins layer well if you want something more abstract than photographs, and both respond to the same adhesive-and-seal method. The real payoff is specificity.
A store stencil or vinyl decal repeats what everyone else owns; a collage carries your actual family onto the mantel, or your actual garden onto the Thanksgiving table.
That personal connection is the whole reason to choose this over a cleaner, quicker technique.
13. Glow-in-the-Dark Pumpkins
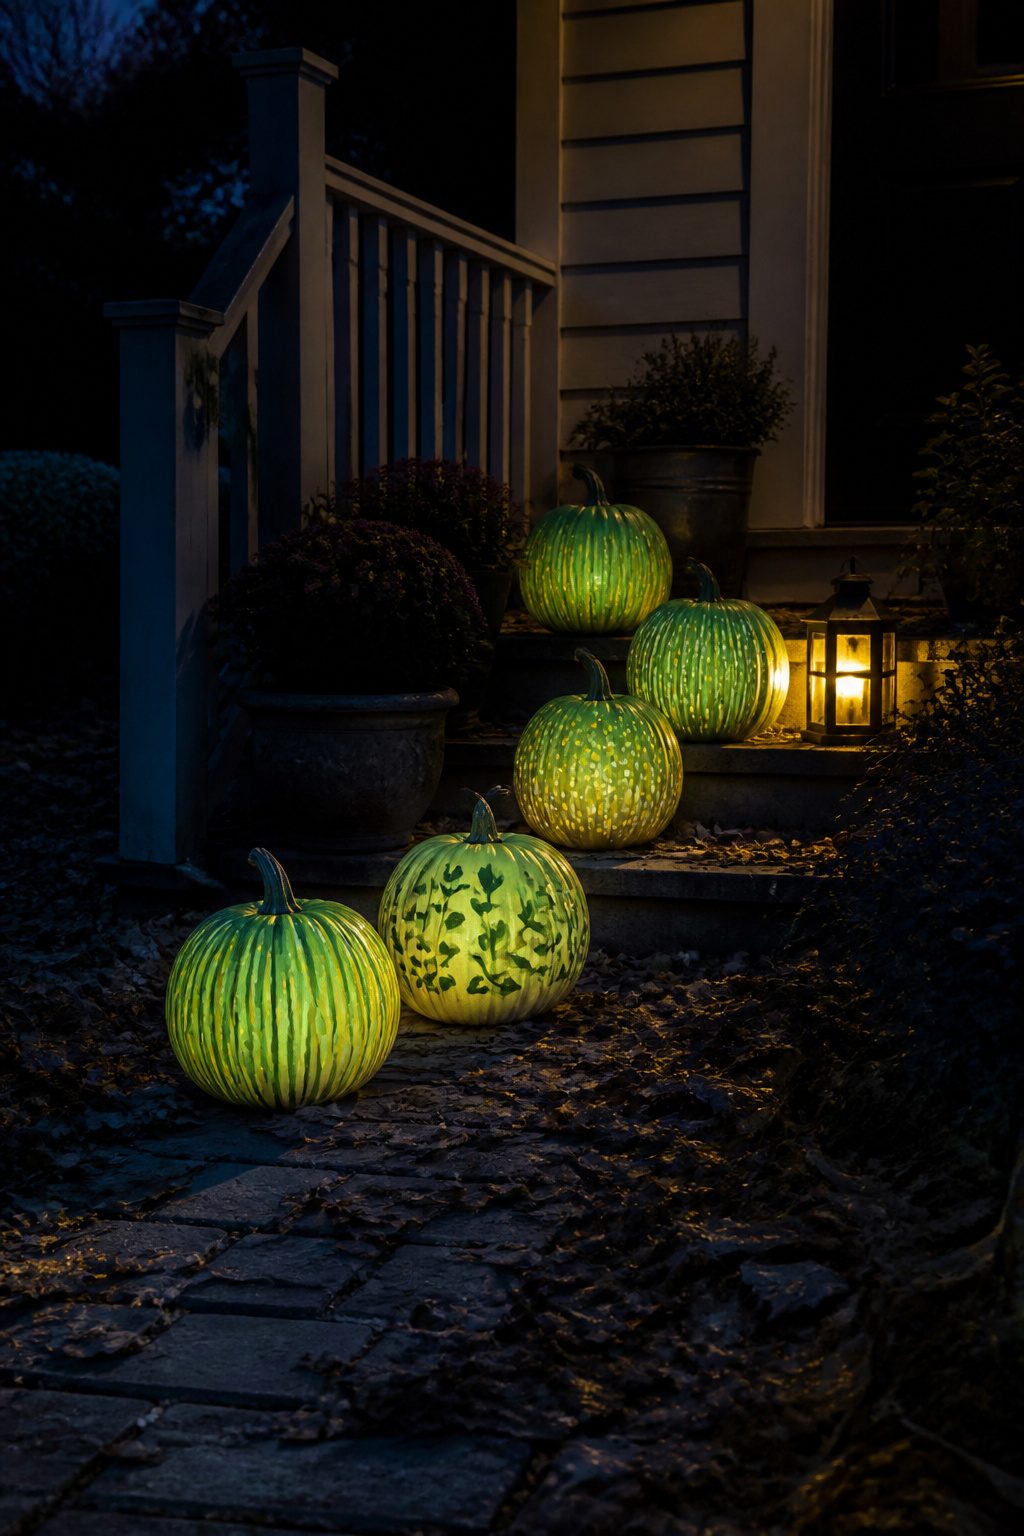
Glow-in-the-dark paint turns an ordinary pumpkin into something that keeps working after the porch light goes out.
Two or three thin coats, applied over a white primer base, give the strongest effect; one heavy coat pools and dries unevenly, which kills the luminosity.
Work under a bright lamp while you paint, since the pigment needs that charge to test your coverage.
A little UV light from a cheap blacklight flashlight does the same if you want to see weak spots before the sun goes down.
These pumpkins do the job of candlelit carvings without the fire hazard on a dry wooden step or crowded apartment landing.
Set them where they will catch direct sun through the afternoon, then move them to a dark corner or railing where passing trick-or-treaters will notice the glow first, not the shape.
The effect lasts a few hours and fades; paint formulas vary, so expect to recharge or refresh after a season of hard use.
14. Washi Tape Pumpkins
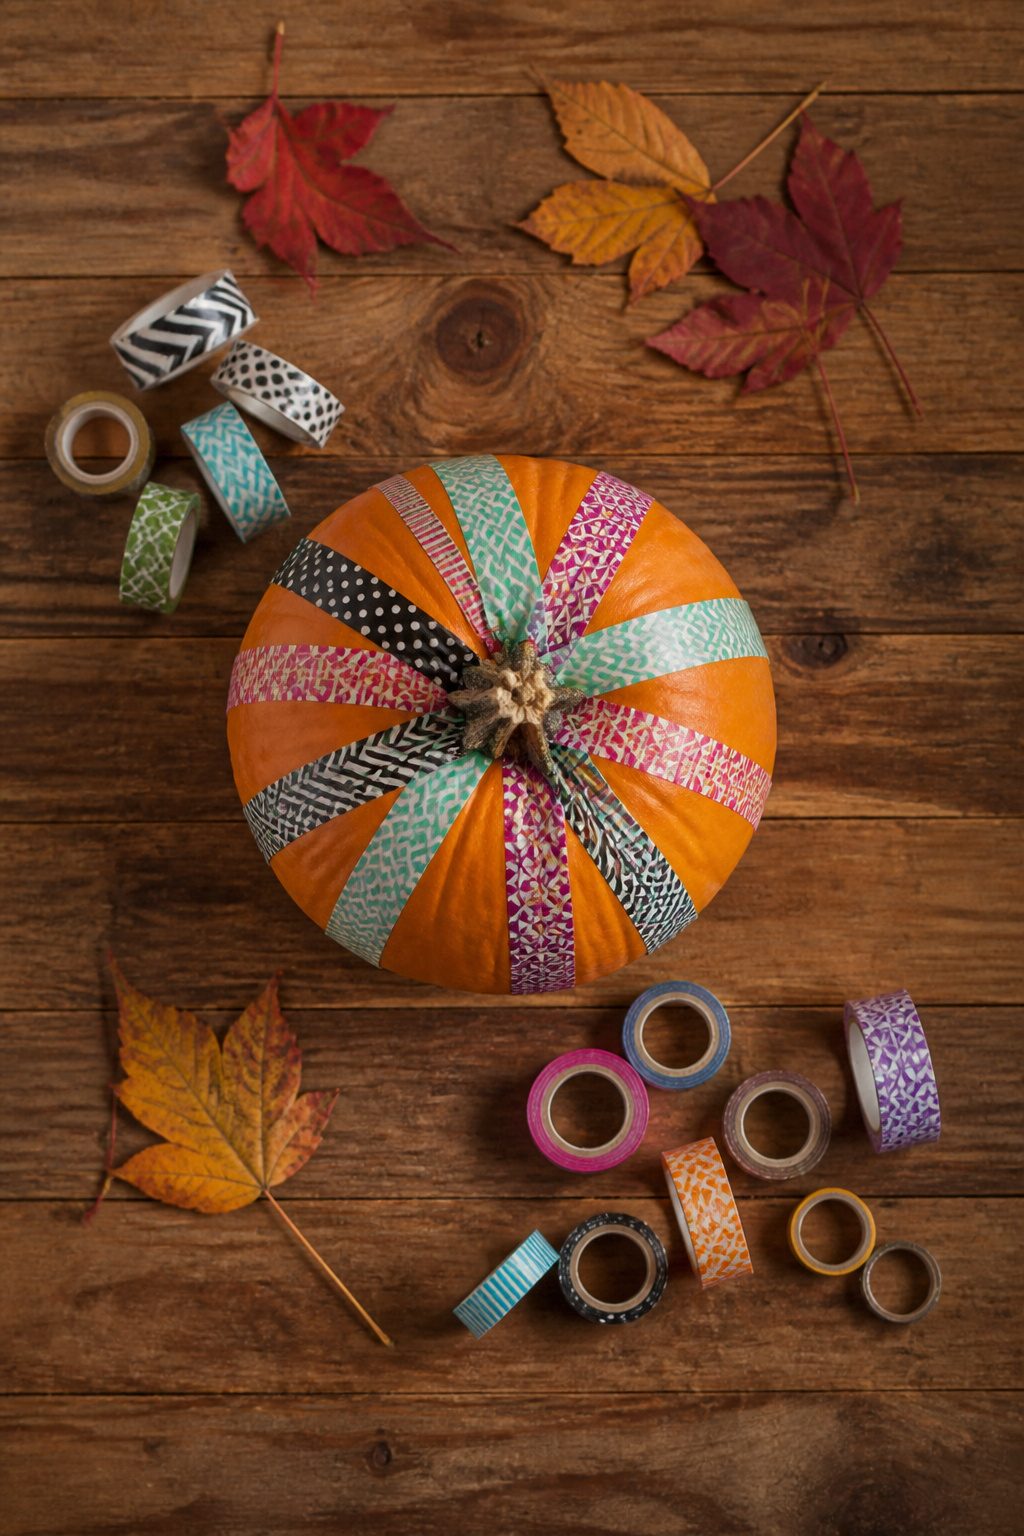
Washi tape turns a pumpkin into something you can revise indefinitely. Peel a strip, press it on, and if the line drifts, lift it and try again.
The backing comes away clean, so the surface underneath stays unmarked. That reversibility matters with small children who change their minds mid-pattern, or with adults who do.
Patterns run from thin single stripes to wide geometric blocks, and layering one tape over another builds color combinations without waiting for anything to dry.
A four-year-old can manage the tearing and sticking mostly alone; the only help mine needed was cutting the end straight with scissors when the tape stretched.
We pulled off two full afternoons of designs, then stripped everything back to the orange skin for a third round the next weekend. The tape leaves no residue, so the pumpkin moves straight from Halloween to November without looking half-finished.
The tradeoff is longevity outdoors. Rain and dew loosen the adhesive over several days, and direct sun can fade some brands within a week.
These stay sharpest on a porch shelf or indoors on a table where they will be handled rather than weathered.
What Paint Works and How Long It Lasts
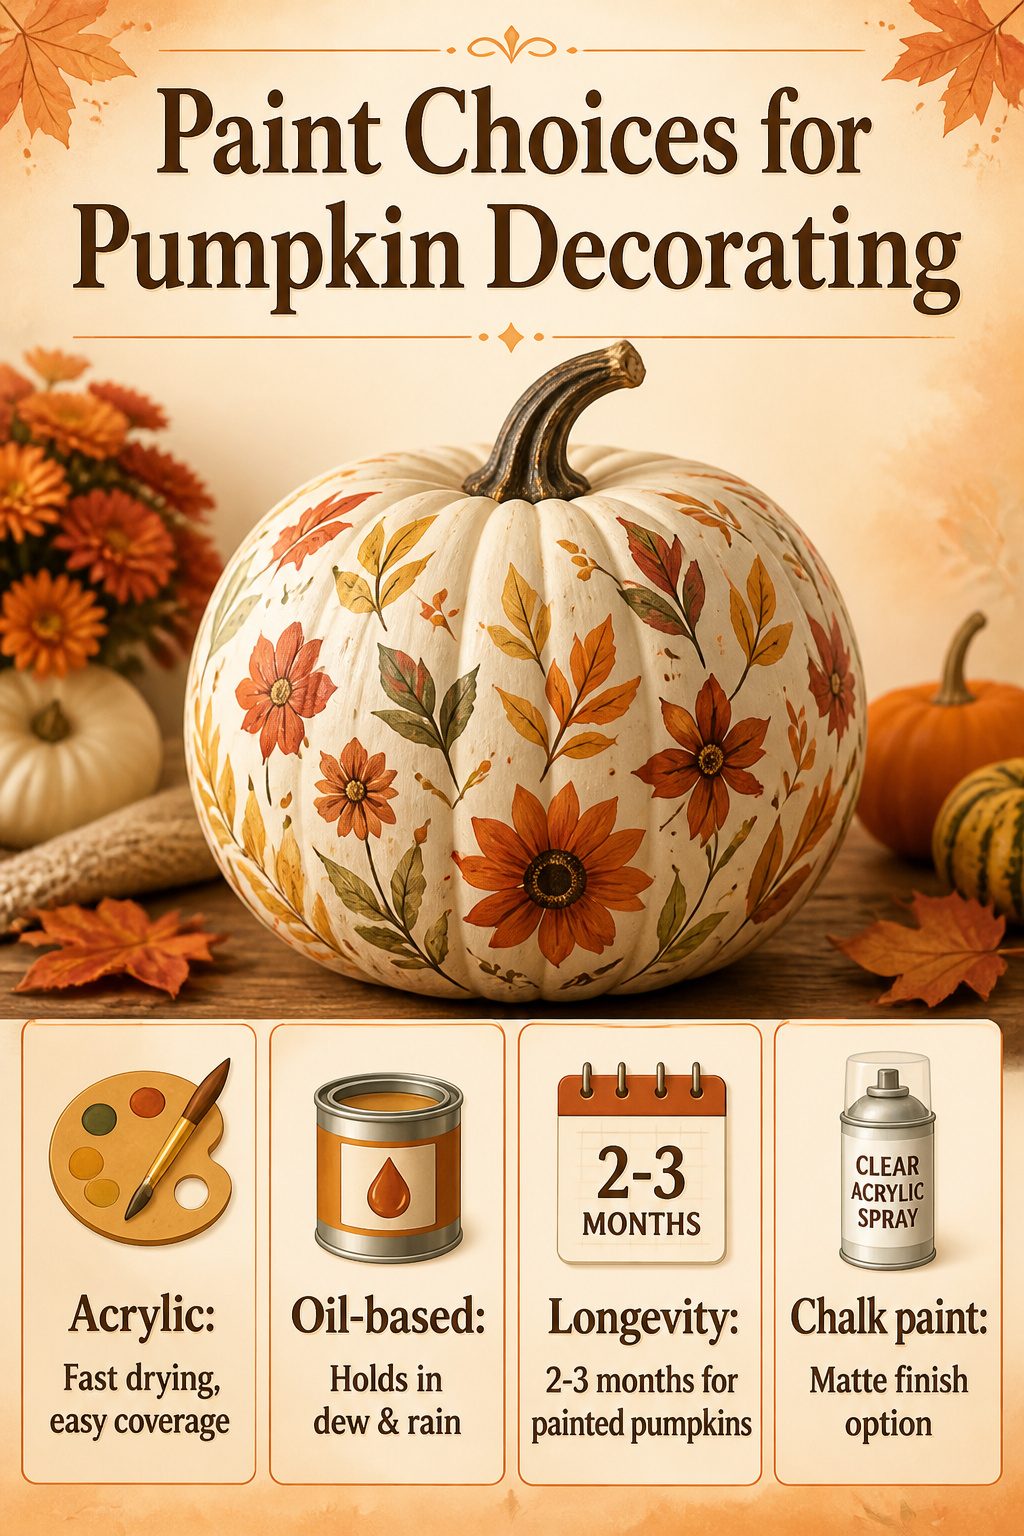
Acrylic paint is the one to reach for, plain and simple. It grips the waxy pumpkin skin well enough that a single coat usually covers it, and it dries in minutes rather than hours.
That quick dry time matters when you’re balancing a pumpkin on a porch railing and the weather’s about to turn.
Oil-based paint does stick longer, which is worth considering for pumpkins that will sit through heavy dew or autumn rains, though the trade is the wait and the cleanup.
A painted pumpkin lasts two to three months if you keep it out of direct rain and out of the sun that bakes the south side.
Carved pumpkins rot in five to ten days once that skin is broken, especially if a candle warms the inside and pulls moisture through the flesh. The difference is weeks against days.
Seal your finished paint job with a clear acrylic spray if you want the full run, and chalk paint gives a matte finish that reads as more deliberate than craft-store bright if that’s the look you want.
Kid-Friendly Methods by Age
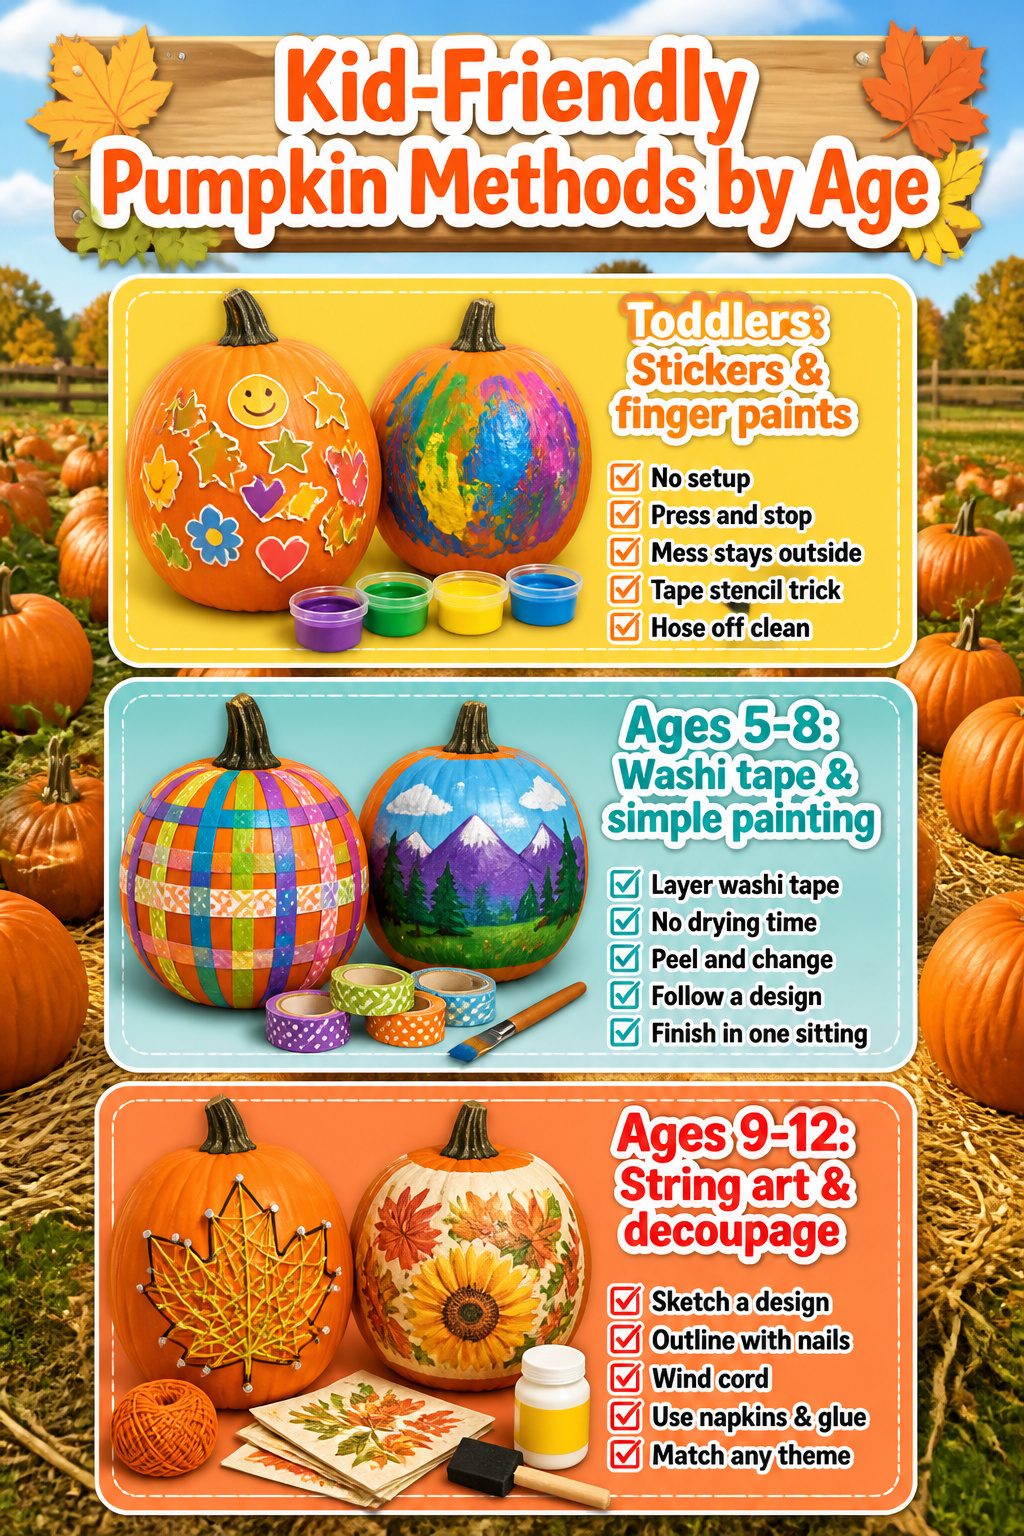
The trouble with most kid-friendly pumpkin guides is lumping a three-year-old and a ten-year-old into the same project. Their dexterity, patience, and tolerance for mess are not the same tools at all.
Here is how the methods actually sort by age, judged on what holds their attention and what they can finish without you taking over.
- Toddlers (about 2–4): stickers and finger paints. Stickers need no setup; a child presses their collection straight onto the pumpkin and stops when they are satisfied. Finger painting on a pumpkin, with or without a painter’s tape stencil underneath, keeps the mess outside and on an object you can hose off. The tape trick, from a couple who did this with their daughter, rewards a toddler’s broad strokes with a neat shape revealed once it dries.
- Early elementary (about 5–8): washi tape and simple painting. Layering different colors and widths of washi tape into a plaid pattern takes steady hands but no drying time, so a child can finish in one sitting and peel it off if they change their mind. Simple brush painting at this stage lets them follow a design instead of just covering surface area.
- Older kids (about 9–12): string art and decoupage. String art asks them to sketch a design, tap nails along the outline, then wind cord between the points for a geometric result that looks deliberate, not accidental. Decoupage with paper napkins and glue scales up to themes they choose themselves and matches whatever party scheme they have in mind.
Materials Worth Keeping on Hand
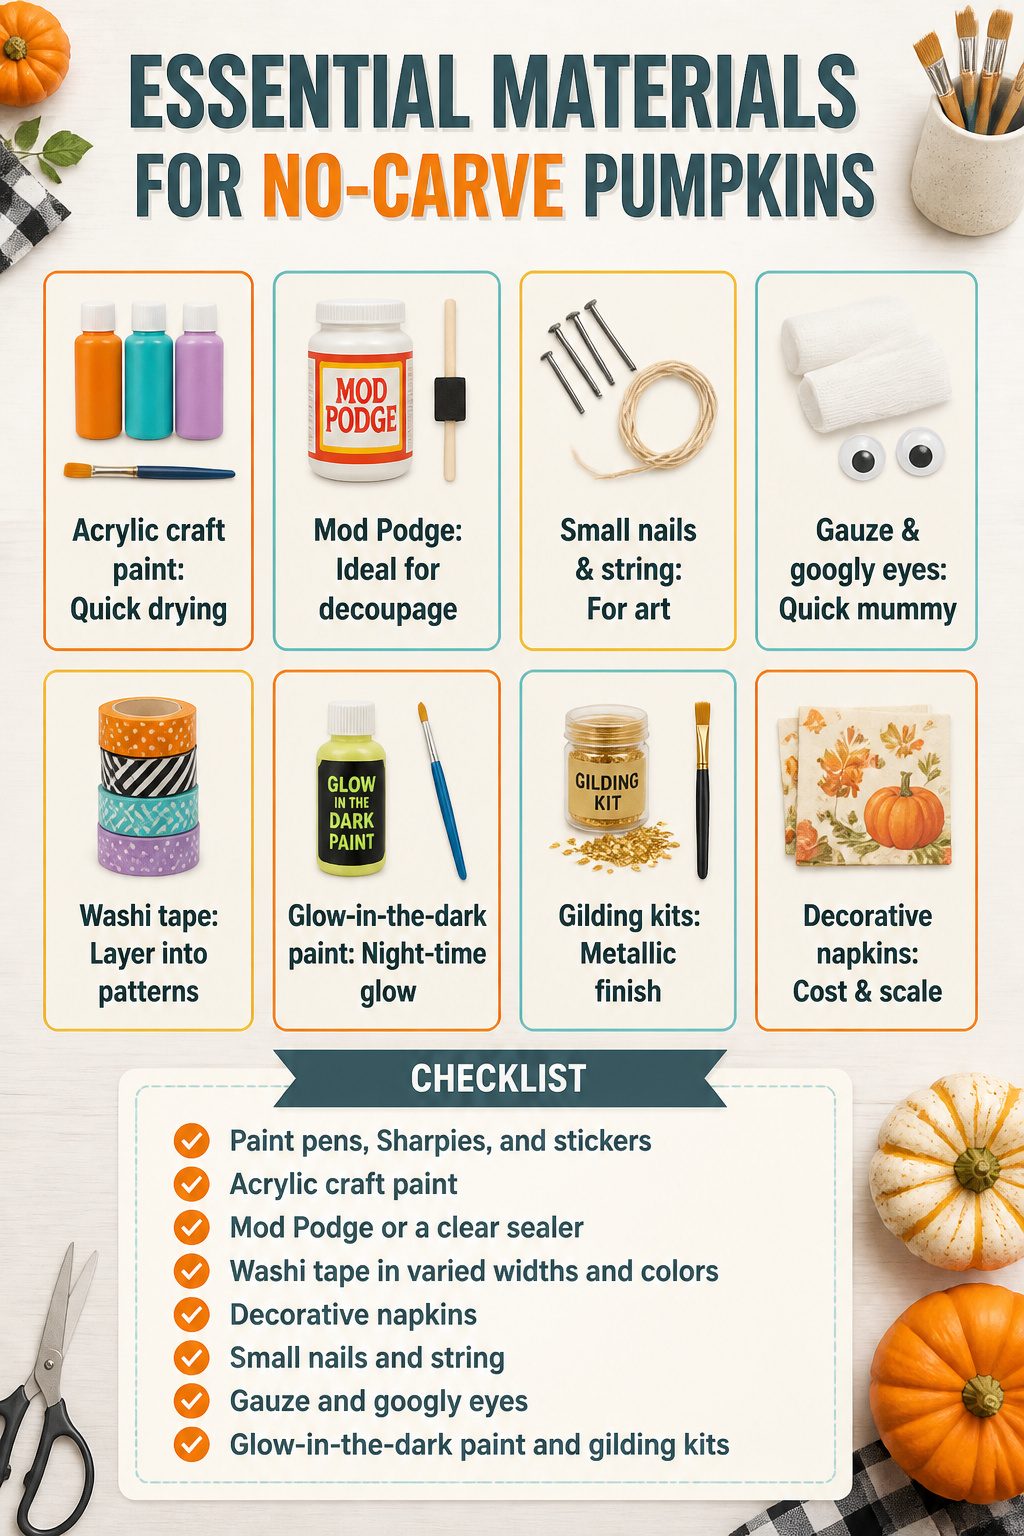
Most no-carve projects need surprisingly little to get started, but a few staples keep coming up across every style. Keep these on hand and you can pivot from one idea to another without another trip to the craft store.
- Acrylic craft paint covers better than tempera and dries fast enough that kids won’t smudge it while moving to the next color.
- Mod Podge or a clear sealer lets you decoupage with napkins or tissue paper and locks the layer down; sources mention both paper napkins and tissue paper as easy picks for this.
- Small nails and string are the backbone of geometric string art, sketched first on the pumpkin surface then filled in with wrapped thread.
- Gauze and googly eyes turn a plain pumpkin into a mummy in about ten minutes of wrapping and gluing.
- Washi tape in varied widths and colors layers into plaid without any cure time; peel it off if the pattern shifts mid-line.
- Glow-in-the-dark paint and gilding kits each solve the trick-or-treater problem, one with a night-time glow and the other with a hit of metallic finish that reads even at porch distance.
- Decorative napkins beat specialty papers for cost and scale, opening up patterns a craft store would charge more for.
- Paint pens, Sharpies, and stickers fill gaps or finish edges when brush work feels too heavy.
I keep these in a shoebox that comes out with the Halloween bin. The paint has a three-year shelf life if the caps seal tight, and Mod Podge thickens slowly enough that a bottle opened in 2024 still brushes smooth.
Real or Faux Pumpkins
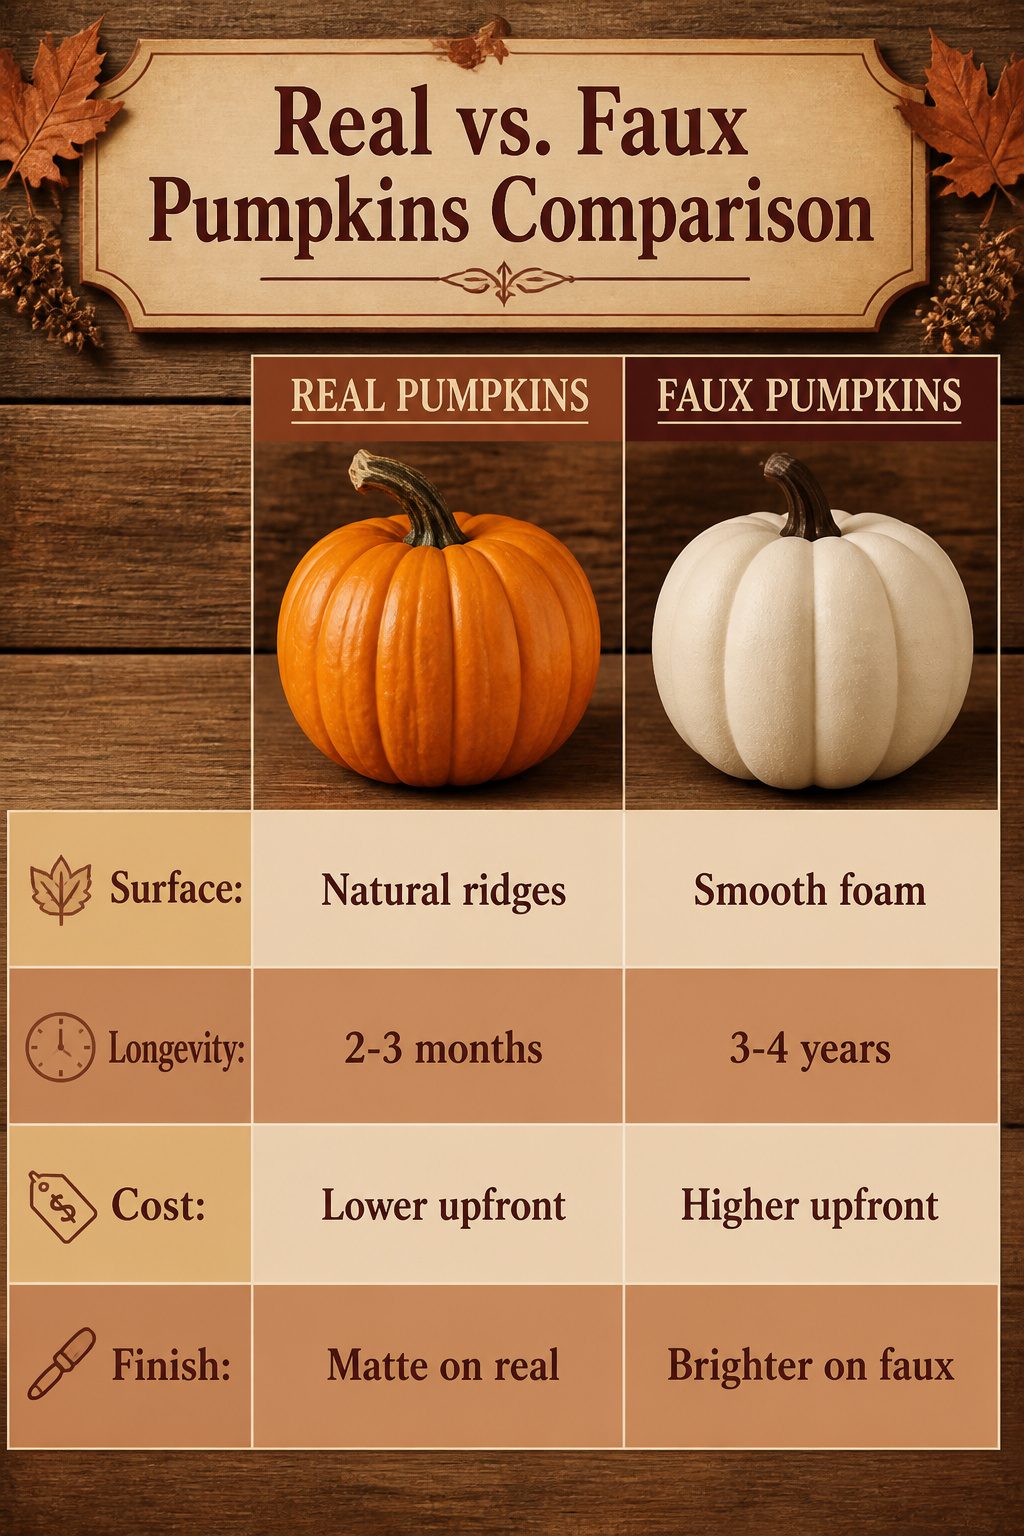
Real pumpkins bring a ridged, organic surface that catches afternoon light in a way foam never quite manages, and once the season ends they go straight into the compost pile.
That same living skin is also why painted no-carve pumpkins may soften before Thanksgiving arrives, while a faux pumpkin from the craft store sits in storage and waits for next October.
Acrylic paint grips both surfaces, but it skids slightly on waxedfoam, so the first coat on a craft pumpkin usually needs thinning with water.
The upfront cost of a faux pumpkin runs higher, and a clear acrylic spray sealer adds another line to the receipt, yet spread across three or four years the math shifts.
Painted real pumpkins last two to three months kept dry and sealed, which is long enough for most households.
Faux pumpkins win if you decorate early and store between seasons; real ones win if you want compost and that uneven, stem-on warmth.
A chalk-painted matte finish looks richer on real skin, but the color stays truer year after year on foam.
Frequently Asked Questions
What are the easiest pumpkin decorating ideas for kids?
Sticker pumpkins, finger painted pumpkins, and mummy pumpkins are the simplest options for children. Stickers need no drying time or cleanup; kids press them straight onto the pumpkin and finish immediately.
Finger painting with painter’s tape stencils lets toddlers cover broad areas while the tape leaves a neat shape underneath.
Mummy pumpkins use gauze strips and googly eyes, which toddlers can help wrap and press into place while an adult handles the hot glue.
How long do painted pumpkins last compared to carved ones?
Painted pumpkins last two to three months when kept dry and out of direct sun, while carved pumpkins rot in five to ten days.
The intact skin of a no-carve pumpkin keeps moisture and bacteria out, whereas a carved jack-o’-lantern opens the flesh to decay. A clear acrylic spray sealer adds extra protection for pumpkins that sit outside through weather.
What paint works best on pumpkins?
Acrylic craft paint grips waxy pumpkin skin best and dries in minutes, so colors won’t smudge while you work.
Oil-based paint sticks longer and resists weather better, which helps for pumpkins on exposed porches, but it requires more cleanup and drying time.
Water-based craft paints like tempera do not adhere as well and can bead or chip on the slick surface.